Workbench Articles

Genesys Engage Application Object Requirements

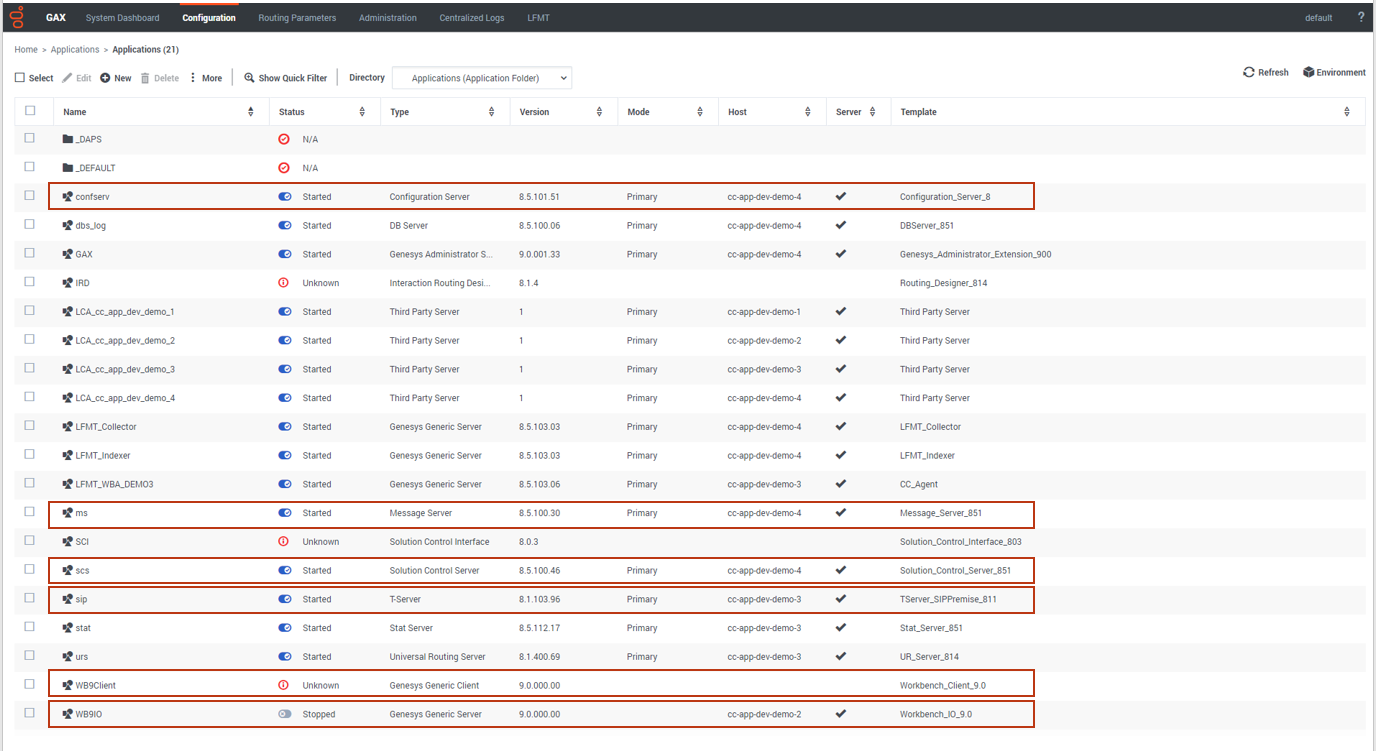
Workbench integrates to the Genesys Engage platform, as such the following Genesys Engage Objects will be required and leveraged by Workbench:

Component Description/Comments
Genesys Engage Workbench Client application/object enables Engage CME configured Users to log into Workbench
Genesys Engage Workbench IO (Server) application/object enables integration from Workbench to the Engage CS, SCS and MS
Genesys Engage Configuration Server application/object enables integration from Workbench to the Engage CS; authentication and Config Changes
Genesys Engage Solution Control Server application/object enables integration from Workbench to the Engage SCS; Alarms to WB from SCS
Genesys Engage Message Server application/object enables integration from Workbench to the Engage MS; Config change ChangedBy metadata
Genesys Engage SIP Server application/object (optional) enables integration from Workbench to the Engage SIP Server enabling the Channel Monitoring feature
*Workbench integrates to SIP Server only and not SIP Server Proxy

WARNING

  • Ensure each and every Engage CME Application has an assigned Template else the Workbench installation will fail.
  • Ensure Engage CME Hosts Objects have an IP address assigned else the Workbench installation will fail.

Example CME objects:

WB 9.1 CME Objects.png

Engage application configuration pre-installation steps

1. Import the installation package import using GAX

The following steps provide a guide to importing the mandatory GAX Workbench 9 Installation Package containing the Workbench 9 Templates and Applications configuration:

  1. Login into GAX.
  2. Navigate to Administration.
  3. Click New.
  4. Select the Installation Package Upload (includes templates) option.
  5. Click Next.
  6. Click Choose File.
  7. Browse to the extracted Workbench_9.x.xxx.xx_Pkg folder.
  8. Double-click into the templates folder.
  9. Double-click into the wb_9.x_gax_ip_template folder.
  10. Double-click the Workbench_9.x_GAX_Template_IP.zip file.
  11. Click Finish.
  12. Click Close when the import has successfully completed.

Example Workbench Installation Package:

WB 9.1 GAX Import Wizard.png

The procedure above will provide the:

IO and Client Templates:

WB 9.1 Template in CMEs.png

Workbench Admin Role:

WB 9.1 Template Role.png

2. Provision the IO (server) application using GAX

NOTE

  • For a successful Workbench installation/run-time, the System/User Account for the Workbench IO application must have Full Control permissions.
  • The "WB9IO" Application will have a dummy [temp] Section/KVP due to mandatory prerequisite packaging.

This Workbench IO (Server) Application is used by Workbench to integrate to Genesys Engage components such as Configuration Server.

  1. Log into GAX.
  2. Navigate to Configuration.
  3. In the Environment section, select Applications.
  4. In the Applications section, select New.
  5. In the New Properties pane, complete the following:
    1. If not already, select the General tab.
    2. In the Name field, enter an Workbench IO Application Name i.e. WB9IO.
    3. Click on the Template field and navigate and select the Workbench_IO_9.x.xxx.xx Template.
    4. In the Working Directory field, enter "..." (period character).
      1. Not explicitly required for Workbench 9, but a mandatory CME field.
    5. In the Command Line field, enter "..." (period character).
      1. Not explicitly required for Workbench 9, but a mandatory CME field.
    6. In the Host field, select the host where Workbench Primary will be installed.
    7. In the Connections tab, click the Add icon to establish connections to the following applications:
      • (Optional) The primary or proxy Configuration Server from which the configuration settings will be retrieved. This is only required if connecting to Configuration Server via TLS. See the Genesys Security Deployment Guide for further instructions. Note: The security certificates must be generated using the SHA-2 secure hash algorithm.
  6. Click Save to save the new application.

The Workbench IO (Server) Application (i.e. "WB9IO") configuration has now been completed; this enables Workbench to Genesys Engage integration both from an installation and run-time perspective.

Wb9 wb io app 1.png

NOTE

  • For a successful Workbench installation/run-time, the System/User Account for the Workbench IO application must have Full Control permissions.
  • The "WB9IO" Application will have a dummy [temp] Section/KVP due to mandatory prerequisite packaging.

3. Provision the client application using GAX

This Workbench Client Application is used by Workbench for Client Browser connections to Workbench, without it, no Users can log into Workbench.

  1. Log into GAX.
  2. Navigate to Configuration.
  3. In the Environment section, select Applications.
  4. In the Applications section, select New.
  5. In the New Properties pane, complete the following:
    1. If not already, select the General tab.
    2. In the Name field, enter an Workbench Client Application Name i.e. WB9Client.
    3. Click on the Template field and navigate and select the Workbench_Client_9.x.xxx.xx Template.
  6. Click Save to save the new application.

The Workbench Client (i.e. WB9Client) Application configuration has now been completed; this enables Users to login to Workbench.

Wb9 wb client app 1.png

NOTE: The "WB9IO" (Server) Application (or equivalent name) will have a dummy [temp] Section due to mandatory prerequisite packaging.

4. Provision the client role using GAX

  1. Log into GAX.
  2. Navigate to Configuration.
  3. In the Accounts section, select Roles.
  4. In the Roles section, select New.
  5. Select None in the drop down for Role Template.
  6. Click OK.
    1. If not already, select the General tab.
    2. In the Name field, enter a Workbench Administrator Role Name - i.e. "WB9_Admin".
    3. In the Description field, enter "When assigned to Users, grants access to the Workbench\Configuration Console."
    4. Select the Role Members tab.
    5. Add your relevant Access Group(s) and/or Person(s).
    6. Select the Assigned Privileges tab.
    7. Check the Workbench Admin Access checkbox.
  7. Click Save.
  8. The WB9_Admin Role has been created.
  9. Therefore, certain assigned Users, will now have visibility/access to the Workbench Configuration Console, enabling the Configuration of Workbench Applications, Settings and Features.

WB 9.1 GAX Import Wizard 2.png

An example of the "Super Administrators" Access Group being assigned the "WB9_Admin" Role:

WB 9.1 GAX Import Wizard 3.png

Wb9 admin access 1.png

Changes console ChangedBy field for Engage changes

For the ChangedBy field to be accurate (not "N/A"), the following configuration is required:

  • A connection from the respective Genesys Engage Configuration Server or Configuration Server Proxy to the Genesys Engage Message Server that Workbench is connected to.
  • If not already, standard=network added to the log section of the Configuration Server or Configuration Server Proxy that Workbench is connected to.
WB 9.1 CS to Ms connection for ChangedBy.png

WB 9.1 CS Log Network standard.png

Download

  1. Login to My Support.
  2. Click Continue to your Dashboard button.
  3. On the Dashboard screen, select the Apps and Tools tile.
  4. On the Apps and Tools screen, select the Workbench tile.
  5. On the Genesys Care Workbench screen, click Download Workbench link.
  6. On the Terms and Conditions screen, click the checkbox to accept the Terms and Conditions, and click Download.
  7. On the zip screen, click Download again.
  8. The result of the above is, depending on the target Workbench host(s) Operating System, a locally downloaded:
    • Workbench_9.x.xxx.xx_WINDOWS.zip file
    • Workbench_9.x.xxx.xx_LINUX.tar.gz file

Configuration

The WB Configuration Console allows the user to manage, configure and view the state/status of the WB components.

WARNING: Use the Delete option with extreme caution; please read and understand these instructions before proceeding:

  • This will permanently delete the WB Host Object from the WB UI and also backend configuration
  • The WB Delete action will NOT delete the respective binaries from the host; that will be a manual task via the respective host post deleting in the WB UI
  • WB Primary Host deletion is NOT supported - only WB Additional Hosts/Nodes can be deleted
  • Pre-Cluster formation
    • Delete WB Secondary WB Host object from configuration page under Host section
      • ALL associated WB component config data will be permanently removed
      • Now and only when the WB Host is deleted, delete the associated Hosts WB Application component config objects one-by-one under Applications section
  • Post-Cluster formation WB Host deletion is NOT recommended

Sub menus

Overview

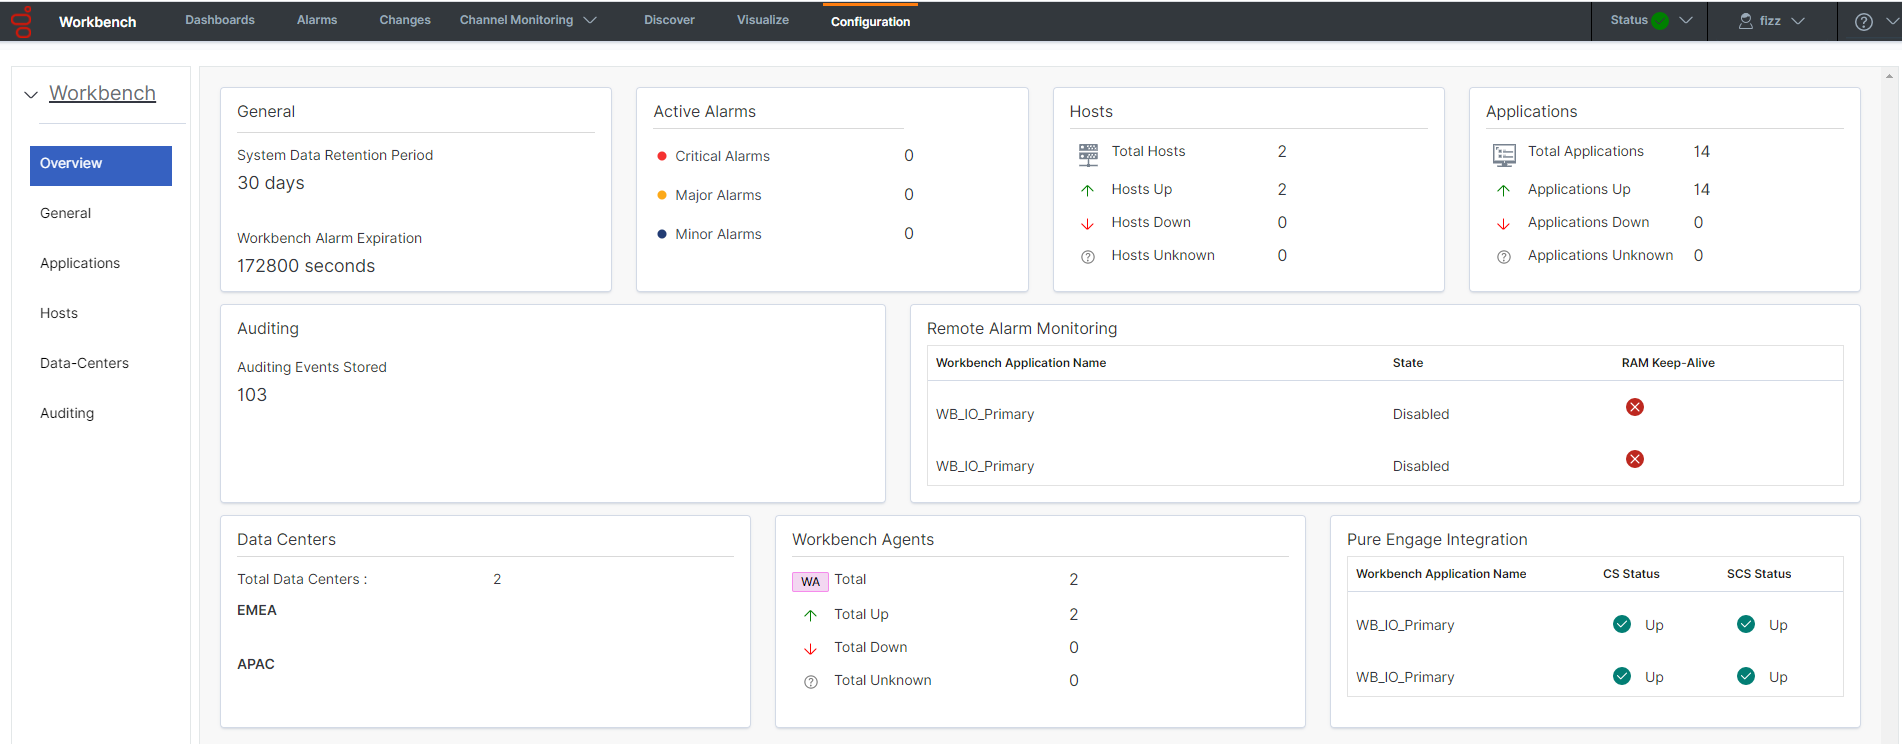
Gain an at-a-glance overview of the state, status and content of the WB components and features

General

System Data Retention Period - this applies to the data stored within WB and the duration for which its stored; if this setting is enabled, data will be permanently deleted post this value; the default is Enabled and 30 days

NOTE: Data Retention values not updated in real-time when viewing this page

Alarm Expiration - this applies to the WB Active Alarms duration, if not resolved, if this setting is enabled, WB alarms (not Genesys Engage) will be automatically closed post this value - i.e. to avoid manually clearing 100 Channel Monitoring active alarms, they would be automatically cleared post this value; the default is Enabled an 172800 seconds (2 days)

NOTE: Alarm Expiration values not updated in real-time when viewing this page

Session Expiration - this applies to the timeout of sessions; Users will be auto logged out of WB if/when a new request is greater than the Session Expiration; if/when the Session Expiration setting is unchecked/disabled, Users will never be auto logged out

Hosts

  • These are either WB hosts or Engage hosts
  • Engage hosts will only be present if the WB Agent is installed on the respective Engage host (i.e. SIP Server host)
  • Only deploy the WB Agent on Engage hosts that you wish to ingest metric data (CPU/RAM/DISK/NETWORK) from
  • This Configuration section allows read-only visibility of WB Host Objects
    • The WB Host objects can be:
    • Deleted (i.e. should there be a need to move/re-install WB Additional components to a new Host/Server)

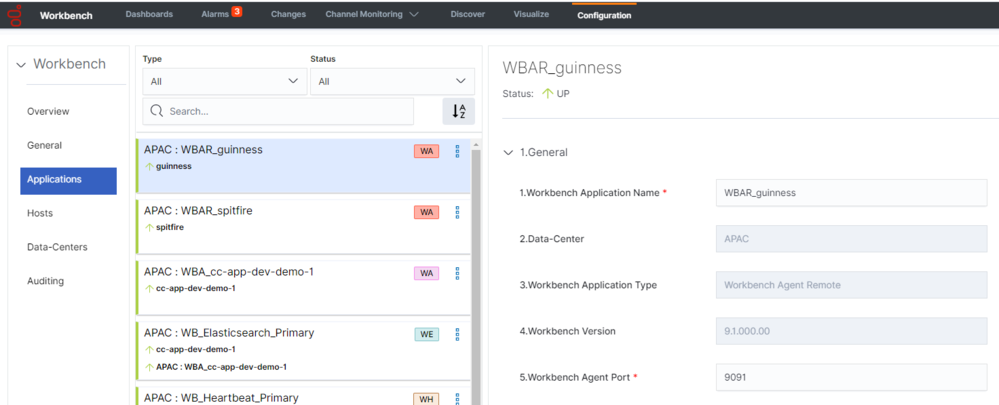
Applications

  • In WB 9.1 there are 8 x WB Application Objects:
    • WB IO (for WB UI and integration to Genesys Engage including the Channel Monitoring feature)
    • WB Agent (for WB status, control and configuration - in WB 9.0 WB Agents are ONLY installed on WB hosts, not Genesys Engage hosts)
    • WB Elasticsearch (for WB storage)
    • WB Kibana (for WB UI)
    • WB Logstash (an ETL pipeline primarily relating to WB Agent Metric data ingestion)
    • WB Heartbeat (for WB component health monitoring)
    • WB Metricbeat (for Host/Process Metric data ingestion in conjunction with the WB Agent component)
    • WB ZooKeeper (for WB configuration)
  • This Configuration section allows visibility and management of the Application Objects above
    • The Application Objects can be:
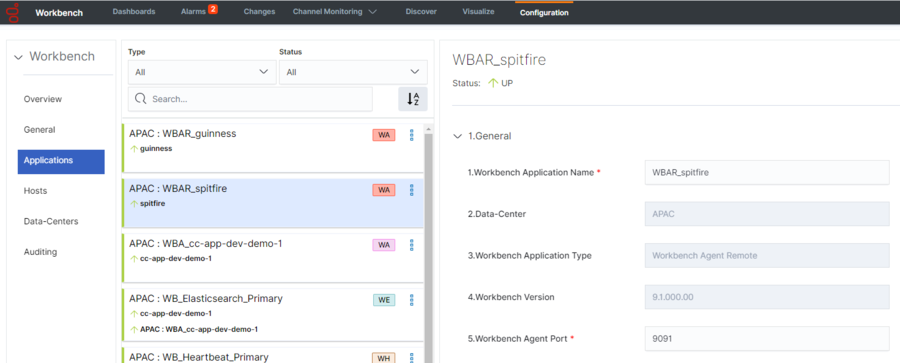
      • Renamed (i.e. WB_IO_Primary to APAC_WB_IO_P)
      • Edited (i.e. change the [WB_Kibana_Primary\HTTP Port] setting from the default 8181 to 9191)
      • Deleted (not the WB Primary host Applications)

Data-Centers

  • The Data-Center(s) name(s) are provided during WB installation and will be displayed according to the value(s) entered

Auditing

  • The WB Audit Console is similar to the Changes Console but also provide visibility of WB User Logins/Logouts; the Audit events will also evolve overtime
    • NOTE: Audit events are not updated in real-time when viewing this page

Architecture prior to Data-Center sync 

The previous Workbench Installation sections in this document result in a Workbench instance/Cluster deployed at a given Data-Center. For example:

Single node Workbench deployed in APAC

  • The Engage Master Configuration Server is deployed in APAC
  • An Engage Distributed Solution Control Server (SCS) is deployed
  • Engage Alarms and Changes from both Data-Centers are being ingested into the APAC Workbench

You have deployed a single node Workbench in EMEA

  • An Engage Configuration Server Proxy is deployed in EMEA
  • An Engage Distributed Solution Control Server (SCS) is deployed
  • Alarms and Changes from both Data-Centers are being ingested into the EMEA Workbench

From a Genesys Engage perspective the APAC and EMEA Data-Centers are integrated via CS Proxy and Distributed SCS architecture

At this stage, the 2 x Workbench deployments are separate from each other, albeit they're integrated to the same Engage platform and you wish to form an holistic, metric data ingestion optimized, distributed Workbench architecture

Check Workbench Component Status at each Data-Center

NOTE

  • Workbench Versions on ALL Nodes and at ALL Data-Centers should be running the same release - i.e. do NOT mix 9.0.000.00 with 9.1.000.00.
  • With the below planning considered, please progress to the next Data-Center Synchronization - Configuration article to begin the process.

Prior to commencing a Workbench Data-Center Synchronization, please ensure the following components, at each Data-Center, have a Up/Green status:

  • Workbench IO
  • Workbench Elasticsearch
  • Workbench ZooKeeper
  • Workbench Agent (running on the respective Workbench Hosts that are going to be synched)

WARNING

  • Please double-check the Workbench components above, at each Data-Center, have a Up/Green status before initiating a Workbench Data-Center Sync
  • Do not change the Elasticsearch Port (i.e. 9200) post Data-Center synchronization - if the default requires change, change before Data-Center Sync
  • Do not change the ZooKeeper Port (i.e. 2181) post Data-Center synchronization - if the default requires change, change before Data-Center Sync

Pre formation

  1. Go to Configuration Page > Data-Center section then click the + button to display the synchronization form.
         
  2. Complete the mandatory (*) fields in the prompt, as well as the Remote Zookeeper Hostname and Remote Zookeeper Port fields. .
         
    • NOTE: If authentication is enabled, you must enter the credentials.
  3. Click the Sync.
    •  WARNING: Wait for the synchronization to complete.
  4. If your remote Zookeeper address is valid and able to connect, it will start progress synchronization and display the progress status on the screen.
  5. Once synchronization completes, click Close.
         
  6. The page is now populated with the synchronized remote Data-Center information.
  7. Check the new/additional remote Workbench Data-Center Host(s) are present in Workbench\Configuration\Hosts.
    • In the example below, CC-APP-DEC-DEMO-3 is the remote EMEA Data-Center host:
           
  8. Check the number of Data-Centers and their names are present in Workbench\Configuration\Overview.
    • In the example below, we have 2 x Data-Centers - APAC (the initiator) and the remote EMEA Data-Center:
          WB 9.1 DC Config Overview Post Sync.png
  9. Repeat for any additional deployments.

Post formation

WARNING

  • The following folders must be deleted:
    • Windows
      • <WB_HOME_FOLDER>\Karaf\resources\windows\wbagent_9.1.100.00_installscripts
    • Linux
      • <WB_HOME_FOLDER>/Karaf/resources/linux/wbagent_9.1.000.00_installscripts
  • When forming a Workbench Cluster, for example adding a Workbench Node 2 or Node 3, or Node N, on completion of forming the Workbench Cluster, the Workbench IO (i.e. WB_IO_Primary) Application now needs to be restarted to regenerate the correct Workbench Agent Remote JSON configuration file”

Renaming a Workbench Data-Center

WARNING

  • The following folders must be deleted:
    • Windows
      • <WB_HOME_FOLDER>\Karaf\resources\windows\wbagent_9.1.100.00_installscripts
    • Linux
      • <WB_HOME_FOLDER>/Karaf/resources/linux/wbagent_9.1.000.00_installscripts
  • If/when a Workbench Data-Center is renamed, the Workbench IO (i.e. WB_IO_Primary) Application needs to be restarted to regenerate the correct Workbench Agent Remote JSON configuration file”

Renaming a Workbench Agent Remote Data-Center

WARNING

  1. Once renamed, if an existing host requires a Workbench Agent Remote re-installation, the newly generated binaries in the following folder must be copied prior to running the installer or executable:
    • Windows
      • <WB_HOME_FOLDER>\Karaf\resources\windows\wbagent_9.1.100.00_installscripts’
    • Linux
      • <WB_HOME_FOLDER>/Karaf/resources/linux/wbagent_9.1.100.00_installscripts

  1. Navigate to Configuration > Applications > WB Elasticsearch > 8.Workbench Elasticsearch Authentication.
  2. Configure the following fields:
    • Enabled: Click this checkbox to enable Elasticsearch Authentication.
    • Username: Provide an Elasticsearch Username (i.e. "WB_ES") which be be used for the Authentication Username Credential.
    • Password: Provide an Elasticsearch Password (i.e. "my_p@ssword123") which be be used for the Authentication Username Credential.
      • NOTE: The password fields include an eye icon button that allows you to see the plain text when entering the password.
    • Confirm password: Provide the Elasticsearch Password (i.e. "my_p@ssword123") again to ensure accuracy.
      • NOTE: The password fields include an eye icon button that allows you to see the plain text when entering the password.
  3. Click Save.
  4. Workbench Elasticsearch Authentication will now be enabled.
  5. Workbench components will be restarted.
  6. Workbench components will connect to the respective Elasticsearch component(s) using the provided credentials.
  7. Workbench Elasticsearch Authentication can be disabled by un-checking the Enabled checkbox and clicking Save.


Elasticsearch authentication provides improved security for the back-end Workbench storage, essentially requiring a username and password to access the Elasticsearch data.

Elasticsearch authentication is not enabled by default and can be enabled through the Workbench UI post installation.
Elasticsearch handles authentication/authorization by using File-based user authentication. All the data about the users for the file realm is stored in two files on each node in the cluster: users and users_roles. Both files are located in Elasticsearch config directory and are read on startup.

The users and users_roles files are managed locally by the node and are not managed globally by the cluster. This means that with a typical multi-node cluster, the exact same changes need to be applied on each and every node in the Workbench cluster, as such, any change from the Workbench UI will be reflected automatically in all other nodes in the cluster.

Pre-Requisites

  • The customer must generate the respective Host/Server Certificates.
  • TLS settings should be configured on the Workbench Hosts Objects that are running the Elasticsearch component (e.g., WB_Elasticsearch_Primary, WB_Elasticsearch.2, WB_Elasticsearch.3.).
  • A copy of Host TLS Certificate must be copied to the respective Elasticsearch configuration directory (e.g., /opt/Genesys/Workbench_9.x.xxx.xx/ElasticSearch/config) in all Workbench Elasticsearch nodes.).

Limitations/Considerations

WARNING

  • All Workbench components will be restarted post enabling Elasticsearch Authentication, therefore Workbench Application statuses will be Red/Down for up to ~3 minutes.
  • Elasticsearch Authentication can be enabled either pre of post Cluster formation; configurations are sync'd automatically to the Additional Elasticsearch nodes when enabled via the Primary Elasticsearch node

Recommended Procedure

Recommended procedure to enable Workbench Elasticsearch Authentication (Elasticsearch Cluster):

  • Install all Workbench Elasticsearch nodes
  • Enable TLS on each Workbench node
  • Form Workbench Elasticsearch Cluster
  • Enable Elasticsearch Authentication

The Workbench installation uses the Ant Installer component, if during the Workbench installation a Network Account install is selected, the Ant Installer prints the username and password details to the ant.install.log file.

NOTE: Genesys recommends the ant.install.log file be manually edited and the password be masked/deleted.

Overview

A Workbench Data-Center(s) is a logical concept to categorize and optimize the respective Workbench Hosts, Applications and ingested data for event distribution, visualization context and filtering purposes, whereby:

  • Each Workbench host, and the respective applications within that host, are assigned to a Data-Center, this is mandatory
  • The Data-Center name is entered during Workbench Primary Node installation
  • The Data-Center name is case-sensitive and a max of 10 characters

Post Workbench Data-Center sync benefits

Workbench Data-Center synchronization forms a distributed Workbench architecture whereby:

  • Engage Alarms can be cleared holistically from any Workbench at any Data-Center
  • Metric data (i.e. CPU/RAM/DISK/NETWORK) from remote Workbench Agents (i.e. deployed on Genesys Application hosts such as SIP, URS, FWK etc) can be ingested into the local Workbench Data-Center instance/Cluster
    • i.e. provides network traffic optimization
  • WB Configuration can be edited/view holistically
    • WB Configuration is based on the Workbench Master – the Workbench Master being the initiator of the WB to WB Data-Center Sync
      • For simplicity, Genesys recommends your Workbench Master is the Workbench deployed at the same Data-Center as the Master Configuration Server
      • Use this Workbench Master as the initiator when synching Workbench Data-Centers
  • Channel Monitoring (CM) Call Flows, Media Files and Reports can be viewed holistically
  • CM Call Flows and Media Files can be added/edited/deleted holistically

Post Workbench Data-Center sync limitations

  • Dashboards and Visualizations from either Data-Center do NOT sync to the other
    • i.e. Post Data-Center Sync, the "APAC" Dashboards will NOT be synched to the "EMEA" Data-Center, and vice-versa
  • Users can ONLY view Metric data from the Data-Center they are logged into
    • i.e. Users cannot log into the APAC Data-Center and view Metrics from the "EMEA" and "LATAM" Data-Centers
  • Only Active Workbench Alarms will be sync’d during the Data-Center to Data-Center syncing process
  • Only Workbench Changes will be sync’d during the Data-Center to Data-Center syncing process based on the Retention Period configured on the WB Master
  • Channel Monitoring Call Flows metadata is sync – not the actual CM Call Flow Object - this enables holistic managment of a Call Flow, irrespective of its Data-Center
    • This is by design, a Channel Monitoring Call Flow is associated with a WB IO application at only 1 x Data-Center

Workbench 9.1 adds a Metric data ingestion feature that enables observability of host and process CPU, Memory, Disk and Network metric data, providing rich insights and analysis capability into host and process metric utilization, performance and trends.

For example, the Workbench Agent Remote component can be deployed on Engage hosts, for example, SIP/URS/STAT or Framework (CS, SCS, MS, DBS etc) Genesys Application Hosts.

Workbench Agent and Workbench Agent Remote

NOTE

  • Workbench Agent 8.5 is ONLY for LFMT
  • Workbench Agent 9.x is ONLY for Workbench 9.x Hosts
  • If/when Workbench and LFMT is deployed, both Workbench Agents 8.5 and 9.x would be needed on each remote host
    • The Workbench Agent 8.5 would be required for LFMT to collect log files from the remote hosts (i.e. sip, urs, gvp etc)
    • The Workbench Agent 9.x would be required for Workbench ingestion of data from the remote hosts (i.e. sip, urs, gvp etc)
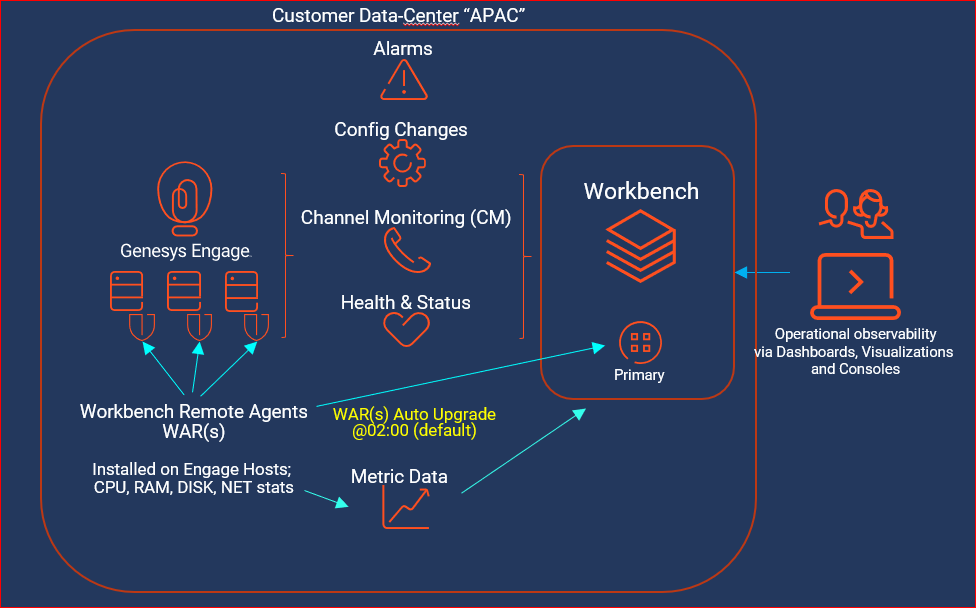
  • Workbench Agent Remote (WAR) 9.x is ONLY deployed on remote Genesys Hosts such as SIP, URS, GVP etc - this components sends Metric data to the Workbench 9.x Server/Cluster
  • It's recommended not to change any Workbench Agent Remote configuration from the default settings, due to a limitation that when upgrading Workbench, all the Workbench Agent Remote configuration will be reverted back to the default settings.

Architecture

Cluster with a single Data-Center

WAR Upgrade.png

NOTE

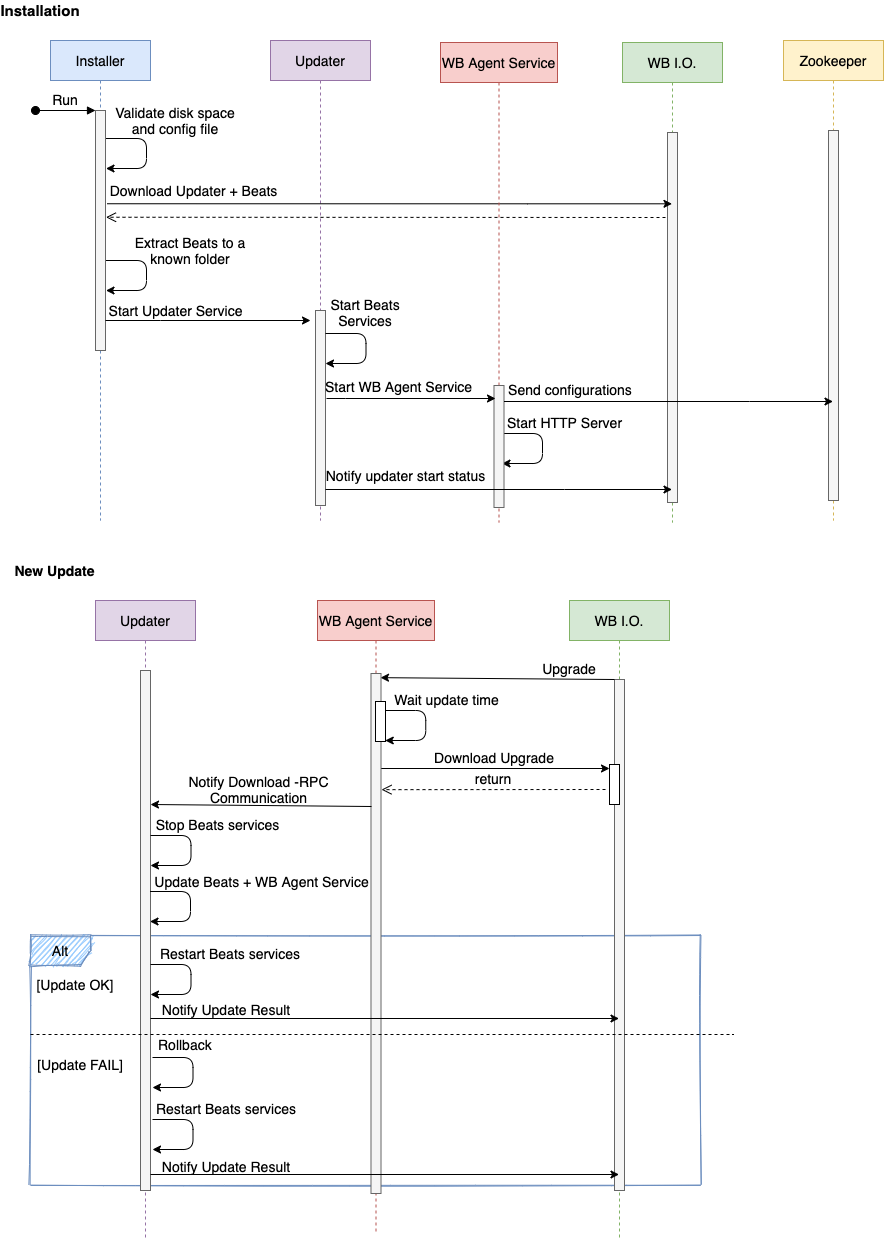
  • Workbench Agent Remote has an Auto-Upgrade feature, thereby the Workbench Agent Remote is a one time install with subsequent upgrades being autonomous (upgrade check performed at 02:00 by default).

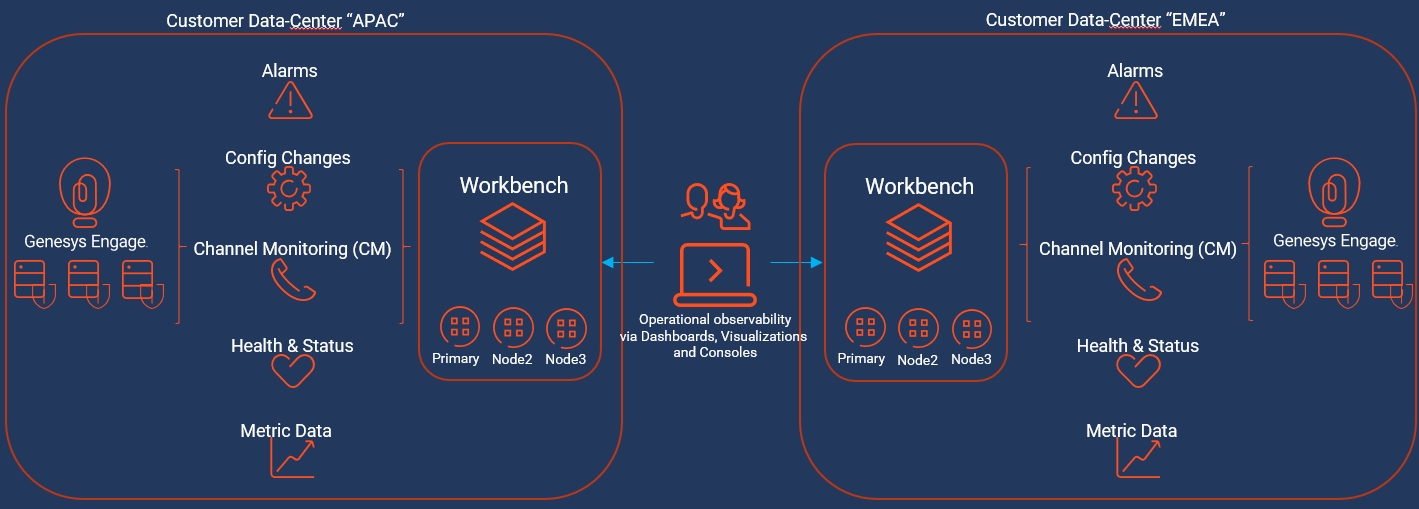
Cluster with a multi Engage Data-Center

WB 9.1 Arch Cluster MultiDC 2021.png

NOTE

  • Users can only visualize Dashboard Metric data based on the Data-Center they're logged into
  • .i.e. A User logged into the APAC Workbench instance/Cluster cannot view Metric data for EMEA - they need to log into the EMEA Workbench instance/Cluster

Components - Run-time

The Workbench Agent Remote Run-time components consist of:

  • Workbench Agent Remote - executable installed as a Service
    • Start a HTTP Server for WB_IO_Primary communication
    • Sends initial configuration of the Workbench Agent Remote to Workbench ZooKeeper
    • Schedules an upgrade if/when an upgrade notification is received from WB_IO_Primary
    • Downloads any new Workbench Agent Remote package, from WB_IO_Primary
    • Validates the checksum of the downloaded package
  • Workbench Agent Metricbeat - executable installed as a Service
    • Transmits Host and Application Metric data to the Workbench instance/Cluster
    • Metric data is visible via Workbench Dashboards and Visualizations
  • Workbench Agent Updater - executable installed as a Service
    • Installs and starts the Metricbeat Service
    • Installs any new updates on the Workbench Agent Remote or the Metricbeat Services.
    • If the upgrade fails, a rollback to the previous version of the Workbench Agent Remote is performed

Components - Installation

The Workbench Agent Remote Installation components consist of:

  • installer.exe (Windows) / installer (Linux)
    • This executable file initiates the silent installation of the Workbench Agent Remote component on the respective remote host
  • install_config.json (both Windows and Linux)
    • This file:
      • contains mandatory configuration used by the installer/uninstall files
      • is auto generated when the Workbench Primary Node is installed
      • can be edited - i.e. change the installtion folder or ports
      • should be edited if/when certain Workbench component configuration is changed

The above components are stored on the Workbench Primary Host/Node, within directories:

Windows

  • <WB_HOME_FOLDER>\Karaf\resources\windows\wbagent_9.1.100.00_installscripts directory (Windows)
    • i.e. C:\Program Files\Workbench_9.1.100.00\Karaf\resources\windows\wbagent_9.1.100.00_installscripts

Linux

  • <WB_HOME_FOLDER>/Karaf/resources/linux/wbagent_9.1.100.00_installscripts directory (Linux)
    • i.e. /opt/Genesys/Workbench_9.1.100.00/Karaf/resources/linux/wbagent_9.1.100.00_installscripts

Installation pre-requisites

WARNING

  • Ensure the Workbench IO application (i.e. WB_IO_Primary is up and running before running the Workbench Agent Remote installer
    • if the WB_IO_Primary application is down, the WAR components will be installed but the associated configuration will be incomplete, resulting in a need to uninstall/install
  • Ensure you open network ports 9091 and 5067, from a firewall perspective, on any remote Host that will be running the Workbench Agent Remote component.

Installing WAR

Windows

  1. Copy the 2 x Pre-Install Workbench Agent Remote Windows component files detailed above:
    • from the <WB_HOME_FOLDER>\Karaf\resources\windows\wbagent_9.1.100.00_installscripts directory on the Workbench Primary Host/Node
    • to C:\tmp\Workbench_Agent_Remote\ (or equivalent) directory of the remote Windows Host(s) - i.e. the Genesys Engage SIP Server Host
    • cd to C:\tmp\Workbench_Agent_Remote\
  2. Run installer.exe (cmd) or .\installer.exe (PS) as Administrator
    • The output/progress/result from running the executable can be found in agent_install.log
  3. The above action has created 3 Windows Services:
    • Genesys Workbench Agent Remote
    • Genesys Workbench Metricbeat
    • Genesys Workbench Agent Updater

WARNING

For each Workbench Agent Remote installation, the Heartbeat component is restarted, this will affect the status displated of ALL Workbench components - therefore, post Workbench Agent Remote installation, please wait several minutes for the Workbench Heartbeat component to restart and status to recover.

WB 9.1 WBAR Win Services.png

Example

WB 9.1 WBAR Win New Object2.png

Linux

  1. Copy the 2 x Pre-Install Workbench Agent Remote Linux component files detailed above:
    1. From the <WB_HOME_FOLDER>/Karaf/resources/linux/wbagent_9.1.100.00_installscripts directory on the Workbench Primary Host/Node
    2. To the home/genesys/tmp/Workbench_Agent_Remote (or equivalent) directory of the remote Linux Host(s) - i.e. the Genesys Engage SIP Server Host
    3. cd to home/genesys/tmp/Workbench_Agent_Remote
  2. Run sudo ./installer (as a sudo privileged user)
  3. The above action has created 3 Linux Services:
    • Genesys_Workbench_Agent_Remote
    • Genesys_Workbench_Agent_Updater
    • Genesys_Workbench_Metricbeat
  4. List/manage the Genesys services using:
    • $ systemctl list-units --type=service --state=active | grep Genesys
    • $ systemctl status Genesys_Workbench_Agent_Remote
    • $ systemctl stop Genesys_Workbench_Agent_Remote
    • $ systemctl start Genesys_Workbench_Agent_Remote
  5. The above Linux Services can be located in /etc/systemd/system

WARNING

  • For each Workbench Agent Remote installation, the Heartbeat component is restarted, this will affect the status displated of ALL Workbench components - therefore, post Workbench Agent Remote installation, please wait several minutes for the Workbench Heartbeat component to restart and status to recover.

Example

WB 9.1 WBAR Linux New Object.png

Workbench Agent Remote Configuration File


The install_config.json contains settings required to successfully install Workbench Agent Remote on a remote Host, these settings are automatically generated during the installation of the Workbench Primary Node/Host.

See # comments inline regarding modifications that may be required to the install_config.json file.

Example install_config.json:

{
"updater" : {
"name" : "WB_Agent_Updater_9.1.100.00",
"executable" : "/opt/Genesys/Workbench_9.1.100.00/updater",
#change the above if a different installation path is required
"displayName" : "Genesys Workbench Agent Updater 9.1.100.00",
"description" : "Genesys Workbench Agent updater service for PureEngage environments",
"arguments" : [ "-rootPath=/opt/Genesys/Workbench_9.1.100.00", "-logPath=/opt/Genesys/Workbench_9.1.100.00/logs" ], 
#change the above if a different installation path is required
"yamlFile" : null
},
"root_folder" : "/opt/Genesys/Workbench_9.1.100.00", 
#change the above if a different installation path is required
"wb_io_ip" : "GEN-WB-1",
"wb_io_port" : "8182", 
# change if the Workbench IO is changed from the default 8181
"wb_io_https_port" : "8182", 
#change the above if the Workbench IO is changed from the default 8181
"logstash_host" : "GEN-WB-1",
"logstash_port" : "5048", 
#change the above if the Workbench Logstash is changed from the default 5048
"datacenter_name" : "APAC", 
# change if the respective Data-Center is changed
"datacenter_id" : "2e048957-b9f1-463b-84bd-116cdf494de2",
"update_hour" : "02:00", 
#the property above should not be modified manually in the file. If needed, you can modify it in Workbench UI, in the configuration properties of the WAR application
"zookeeper_hosts" : [ "GEN-WB-1:2181" ],
"local_http_port" : "9091", 
#change the above if the Workbench Kibana is changed from the default 9091
"local_https_port" : "8443", 
#change the above if the Workbench Kibana is changed from the default 8443
#the properties below should not be modified manually, doing this will cause Workbench Agent Remote (WAR) to behave unexpectedly
"tls_server_cert_file" : "na",
"tls_server_key_file" : "na",
"tls_ca_cert_file" : "na",
"enable_tls" : false,
"enable_mutual_tls" : false,
"update_file_name" : "wbagent_9.1.100.00.tar.gz",
"update_file_checksum" : "166ca35224bff0194c1d94c40e216a6ac249eca3284f92bbad39811528c95678",
"download_endpoint" : "wb/upgrade/upgrade-download",
"notify_endpoint" : "wb/upgrade/notify"
}

Post installation

Validate the installation

Ensure the Workbench Agent Remote Services below are running:

  • Genesys Workbench Agent Remote
  • Genesys Workbench Metricbeat
  • Genesys Workbench Agent Updater

If the above Services are not present, check the agent_install.log file for the highlighted terms below:

time="2020-MM-DDT13:48:34Z" level=info msg="Available disk space meets requirements for the agent installer" available_MB=145032 min_MB_needed=100
time="2020-MM-DDT13:48:34Z" level=info msg="Found installation configuration file"
time="2020-MM-DDT13:48:34Z" level=info msg="Configuration loaded"
time="2020-MM-DDT13:48:34Z" level=info msg="Downloading file from: http://WB-1:8182/wb/upgrade/upgrade-download?file=wbagent_9.1.100.00.zip"
time="2020-MM-DDT13:48:34Z" level=info msg="Downloading file to path: C:/Program Files/Workbench_9.1.100.00\\wbagent_9.1.100.00.zip"
time="2020-MM-DDT13:48:34Z" level=info msg="Downloaded compressed file successfully"
time="2020-MM-DDT13:48:37Z" level=info msg="Files successfully extracted, compressed file:C:/Program Files/Workbench_9.1.000.00\\wbagent_9.1.100.00.zip"
time="2020-MM-DDT13:48:37Z" level=info msg="Creating updater service..."
time="2020-MM-DDT13:48:37Z" level=info msg="Done creating updater service"
time="2020-MM-DDT13:48:37Z" level=info msg="Installing updater service named: Genesys Workbench Agent Updater 9.1.000.00"
time="2020-MM-DDT13:48:37Z" level=info msg="Starting updater service..."
time="2020-MM-DDT13:48:37Z" level=info msg="Updater service status: RUNNING"

Metric data transmission

Post installation, Workbench Agent Remote will send Metric (Host/Application CPU/RAM/DISK/NETWORK) data to the respective local Data-Center Workbench instance/Cluster

  • Host Metric Data
    • Host CPU and RAM Metrics - enabled by default - cannot be disabled
    • Host Disk, Network and Uptime Metrics can be enabled/disabled
    • The default Host Metric transmit frequency to the respective Workbench instance/Cluster is 60 seconds
  • Application/Process Metric Data
    • Application/Process can be transmitted based on Top 10 or Specific Process Names (i.e. "metricbeat.exe")
    • The Top 10 (CPU/RAM) Application/Process Metrics
    • Application/Process Metrics are summarised by default
    • The default Application/Process transmit frequency to the respective Workbench instance/Cluster is 60 seconds

NOTE

  • Any changes to Sections 5 Host Metrics and 6 Application Metrics of the Workbench Agent Remote configuration does NOT required a restart of Services; the changes are dynamic.

Auto upgrade

Workbench Agent Remote has an auto-upgrade capability, therefore installing Workbench Agent Remote is a one time exercise; when new Workbench or Workbench Agent Remote versions are released, the respective Workbench Agent Remote components can be automatically upgraded based on receiving an upgrade notification from the Workbench IO application.

Each Workbench Agent Remote application installed on a remote, non Workbench host:

  • Will receive a notification from the Workbench IO application if/when a new Workbench Agent Remote component is available for upgrade
  • Has Auto Upgrade enabled by default
  • Checks the hash of the downloaded file to validate it matches the original upgrade notification received from Workbench IO
    • If it matches the upgrade if initiated based on the Upgrade Time value
  • The upgrade on the remote Host by default will occur at 02:00 - change via Section 3. Auto Upgrage - Upgrade Time value if required
  • The Section 3. Auto Upgrage - Upgrade Time value can be changed for each Workbench Agent Remote application
    • Providing flexibility as to when the auto upgrade check/action will be initiated.

Example

  1. In Workbench Configuration > Applications, for each of the Workbench Agent Remote (WAR) applications, set the desired upgrade time (default is 02:00).
    • The upgrade time is relative to the destination machine where WAR is installed
      • e.g. if the WB time is Eastern time-zone and WAR machine is in Pacific time-zone, the time must be in Pacific time-zone.
  2. Delete (archive to a different folder) any previous/existing Workbench Agent Remote (WAR) package (wgagent_9.1.100.00.zip or wbagent_9.1.100.tar.gz) files within
    • <WB_HOME_FOLDER>/Karaf/resources/windows/data for Windows
    • <WB_HOME_FOLDER>/Karaf/resources/linux/data for Linux
  3. Copy the new WAR package (.zip or .gz) file to
    • <WB_HOME_FOLDER>/Karaf/resources/windows/data for Windows
    • <WB_HOME_FOLDER>/Karaf/resources/linux/data for Linux
  4. The checksum for the new package will be calculated (this will take a few minutes)
  5. After the checksum is calculated, an upgrade notification is sent to Workbench Agent Remote (WAR)
  6. Once Workbench Agent Remote (WAR) receives the notification, it will schedule the upgrade
  7. The Workbench Agent Remote (WAR) upgrade will automatically occur based on the upgrade time
  8. The Workbench Agent Remote (WAR) Application will be automatically restarted
  9. The Workbench Agent Remote (WAR) will now be running the updated package

NOTE

  • Please note that if the Upgrade Time is updated after the new WAR package is copied, the time change will take effect based on the old time value and not the new updated time
  • Workbench upgrades starting from version 9.1 will automatically trigger the upgrade of any WAR components that existed prior to the Workbench upgrade.

Set the update time

WB 9.1 WBAR Auto Upgrade.png

Auto upgrade sequence diagram

The diagram below details the Workbench agent Remote installation and upgrade functions:

WB 9.1 WBAR Install UML.png

Uninstall WAR

Windows

  1. On the respective Remote Host(s) - i.e. UK-SIP-1
  2. cd to C:\Program Files\Workbench_9.1.100.00\ (or equivalent) directory
  3. Run uninstall.exe (cmd) or .\uninstall.exe (PS) as Administrator
  4. This will remove the 3 x Windows Services:
    • Genesys Workbench Agent Remote
    • Genesys Workbench Metricbeat
    • Genesys Workbench Agent Updater
  5. An uninstall.log is also created detailing the uninstallation progress.

NOTE

  • Workbench Agent Remote will no longer send Host and Application Metrics to the Workbench instance/Cluster, therefore Dashboard visualizations will not present any data for the respective host(s) that have had Workbench Agent Remote uninstalled.

WARNING

  • Post Workbench Agent Remote uninstall, the uninstall.exe and uninstall.log files will need manual deletion.

Linux

  1. On the respective Remote Host(s) - i.e. UK-SIP-1
  2. cd to /opt/Genesys/Workbench_9.1.100.00/ (or equivalent) directory
  3. Run sudo ./uninstall (as a sudo privileged user)
  4. This will remove the 3 x Linux Services:
    • Genesys_Workbench_Agent_Remote
    • Genesys_Workbench_Metricbeat
    • Genesys_Workbench_Agent_Updater
  5. An uninstall.log is also created detailing the uninstallation progress.

NOTE

  • Workbench Agent Remote will no longer send Host and Application Metrics to the Workbench instance/Cluster, therefore Dashboard visualizations will not present any data for the respective host(s) that have had Workbench Agent Remote uninstalled.

WARNING

  • Post Workbench Agent Remote uninstall, the uninstall and uninstall.log files will need manual deletion

Security

Login Authentication Requirement

  • Workbench uses Genesys Configuration Server authentication.
  • To login to Workbench, each user needs a valid Configuration Server User Name and Password with Read and Execute permissions to use the Workbench Client (e.g., WB9_Client) application.

Network

Data ingested by Workbench (including Alarm, Changes, Channel Monitoring and Metric events) from the Genesys Engage platform is stored locally in the customer environment; the customer is responsible for protecting this data.

Outbound Network Connectivity Requirements (Remote Alarm Monitoring (RAM) Subscribers)

In some customer environments, outbound network connectivity is restricted. If you subscribe to the Remote Alarm Monitoring (RAM) service from Genesys Care, you will need to enable minimal connectivity for Workbench to send alarms from the Remote Alarm Monitoring service to Genesys for processing. This processing includes routing alarms to Genesys support analysts and displaying alarm notifications in the Genesys Care Mobile App.

The outbound connectivity should allow connectivity from the Workbench host/server to "alarm.genesys.com" (208.79.170.12) on port 443; you may need to engage your networking or security team to enable this connectivity.

NOTE: This Remote Alarm Monitoring connectivity requirement only applies if you are using the Remote Alarm Monitoring Service with Workbench.

Windows

The Workbench installation files will be contained in the Genesys My Portal obtained downloaded compressed file.

See also Downloading Workbench.

NOTE

  • Workbench requires the installation of a Primary Node at each and every Data-Center.
  • The Workbench Primary Node must be installed prior to installing Workbench Additional Nodes.
  • Workbench ships with its own pre-bundled Java distribution, OpenJDK11; all Workbench components will be configured through the installation to use this Java distribution and should not affect any other components that may be installed on the host.
  • The Workbench installation uses the Ant Installer component, if during the Workbench installation a Network Account install is selected, the Ant Installer prints the username and password details to the "ant.install.log" file. Genesys therefore recommends, post installation, at a minimum the "ant.install.log" file be manually edited and the password be masked/deleted.
  • Use an Administrator level account when running the Workbench install.bat file.
  • Genesys does not recommend installation of its components via Microsoft Remote Desktop
  • If the Workbench installation is cancelled mid completion, please ensure the Workbench install directory is cleaned/purged prior to attempting another install

WARNING

  • Workbench uses the Hostname for component configuration
  • Please ensure hostname resolution between Workbench and Engage Hosts is accurate and robust
  • If the Workbench Hosts have multiple NIC's, please ensure the Hostname resolves to the desired IP Address prior to Workbench installation

How to install Workbench 9.x.xxx.xx

  1. Extract the downloaded Workbench_9.x.xxx.xx_WINDOWS.zip compressed zip file.
  2. Navigate into the Workbench_9.x.xxx.xx_WINDOWS\ip\windows folder.
  3. Extract the Workbench_9.x.xxx.xx_Installer_Windows.zip compressed zip file.
  4. Navigate into the Workbench_9.x.xxx.xx_Installer_Windows folder.
  5. Open a Command/Powershell Console As Administrator and run install.bat.
  6. Click Next on the Genesys Care Workbench 9.x screen to start the Workbench installation.
  7. Review and agree to the Genesys Terms and Conditions to continue.
  8. Select New Installation on the Installation Mode screen.
  9. Select the Installation Type.
  10. The next Workbench Installation Type screen contains multiple Workbench installation options; Workbench contains multiple components:
    • Workbench IO
    • Workbench Agent
    • Workbench Elasticsearch
    • Workbench Kibana
    • Workbench Logstash
    • Workbench Heartbeat
    • Workbench ZooKeeper
  11. Select Primary Node (given we're installing the first, Primary, Workbench node/components).
  12. Next, choose between the Default or Custom installation type.
    • For the Default type, the respective Workbench component default (including binaries, paths, config, ports etc) options will be used.
    • Or, if required, you can change these default options (paths, config, ports etc) by selecting a Custom install.
      • NOTE: The Workbench Primary Node installation must/will include ALL of the Workbench components above. Therefore if/when Primary Node is selected, ALL mandatory Workbench Primary components above will be installed on the host.
  13. ​​​Once you’ve selected the appropriate options, click Next.
    • NOTE: For High Availability (HA), you can install additional Workbench application nodes/components.
  14. Provide the Workbench Data-Center name (i.e. "EMEA" or "LATAM" or "Chicago" - do NOT use "default")
    • NOTE: Workbench Data-Centers is a logical concept to categorize and optimize the respective Workbench Hosts, Applications and ingested data for event distribution, visualization context and filtering purposes. Each Workbench host, and the respective applications within that host, are assigned to a Data-Center, this is mandatory. 
    • NOTE: The Data-Center name is case-sensitive, limited to a maximum of 10, Alphanumeric and underscore characters only.​​​
  15. Once the Data-Center name has been entered, click Next.
  16. The next Base Workbench Properties screen provides basic information that is relevant to all Workbench components
    • This is required irrespective of whether the installation is Primary or Additional and if Default or Custom was chosen.
    • Provide the Workbench Home Location folder where Workbench components will be installed (i.e. "C:\Program Files\Workbench_9.x.xxx.xx").
    • Review the network Hostname - this should be accessible/resolvable within the domain
    • Based on the Planning/Sizing section, enter the Total number of Workbench Elasticsearch Nodes to be used by the Workbench solution.
      • The default 3 Elasticsearch Node value is correct even if a 1 x Workbench stand-alone architecture is being deployed; this enables future expansion if/when needed.
  17. Once all required information is added, click Next.
    • NOTE: The Elasticsearch component is bundled with Workbench and is used to store all of the ingested data related to Workbench. An instance of Elasticsearch is installed through the Workbench Primary Node installation; For other, HA node instances, you can use the Workbench installer and proceed through the Workbench Additional Node(s) installation.
  18. The next Primary Components To Be Installed screen lists the Workbench components that will be installed for the Primary Node
    • ALL the Workbench components to be installed are selected by default, since these are mandatory
  19. Click Next to continue.
    • NOTE: The Workbench Agent is installed regardless of whether this is a Primary or Additional Node(s) installation.
    • NOTE: The Workbench Server and Client applications must have been previously created/existing in the Genesys Engage Configuration Server; please review the Planning and Deployment\Planning section of this document for more details. From a Workbench perspective these Applications are case-sensitive therefore please verify case/spelling.
  20. The next PureEngage (PE) Configuration Server (CS) Settings screen relates to the Workbench to Genesys Engage integration:
    • Provide the Genesys Engage Configuration Server Hostname/IP address
    • Provide the Genesys Engage Configuration Server Port (i.e. 2020)
    • Provide the Genesys Engage Workbench Server Application Name (i.e. "WB9IO")
    • Provide the Genesys Engage Workbench Client Application Name (i.e. "WB9Client")
  21. Once complete, verify the settings, click Next.
  22. The next Genesys Engage Solution Control Server and Message Server Settings screen enables selection of the Genesys Engage Solution Control Server (SCS) and Message Server (MS) applications to which Workbench will connect.
  23. Select the relevant Genesys Engage SCS and MS applications, based on the associated Configuration Server from the previous screen, for Workbench to connect to and click Next.
  24. The next Service Account Settings screen enables the selection of either System or Network Account.
    • The Workbench components are installed and executed as Services. Select either Local System Account or a Network Account; if Network Account is selected, provide the Username and Password to be used.
  25. Once complete, click Next.
  26. With all the workbench options now configured, press Install to start the Workbench installation process.
    • NOTE: The Show Details button allows you to review the steps the installer is taking to install the Workbench component(s). This is also a good source for any errors that may be observed.
  27. ​​​​When the Workbench installation completes the dialog below will be presented. Click OK or Exit.

Initial login

  1. Navigate to your host's URL. It will look something like:
    • http://<WORKBENCH_HOST>:8181
  2. Enter your login credentials.
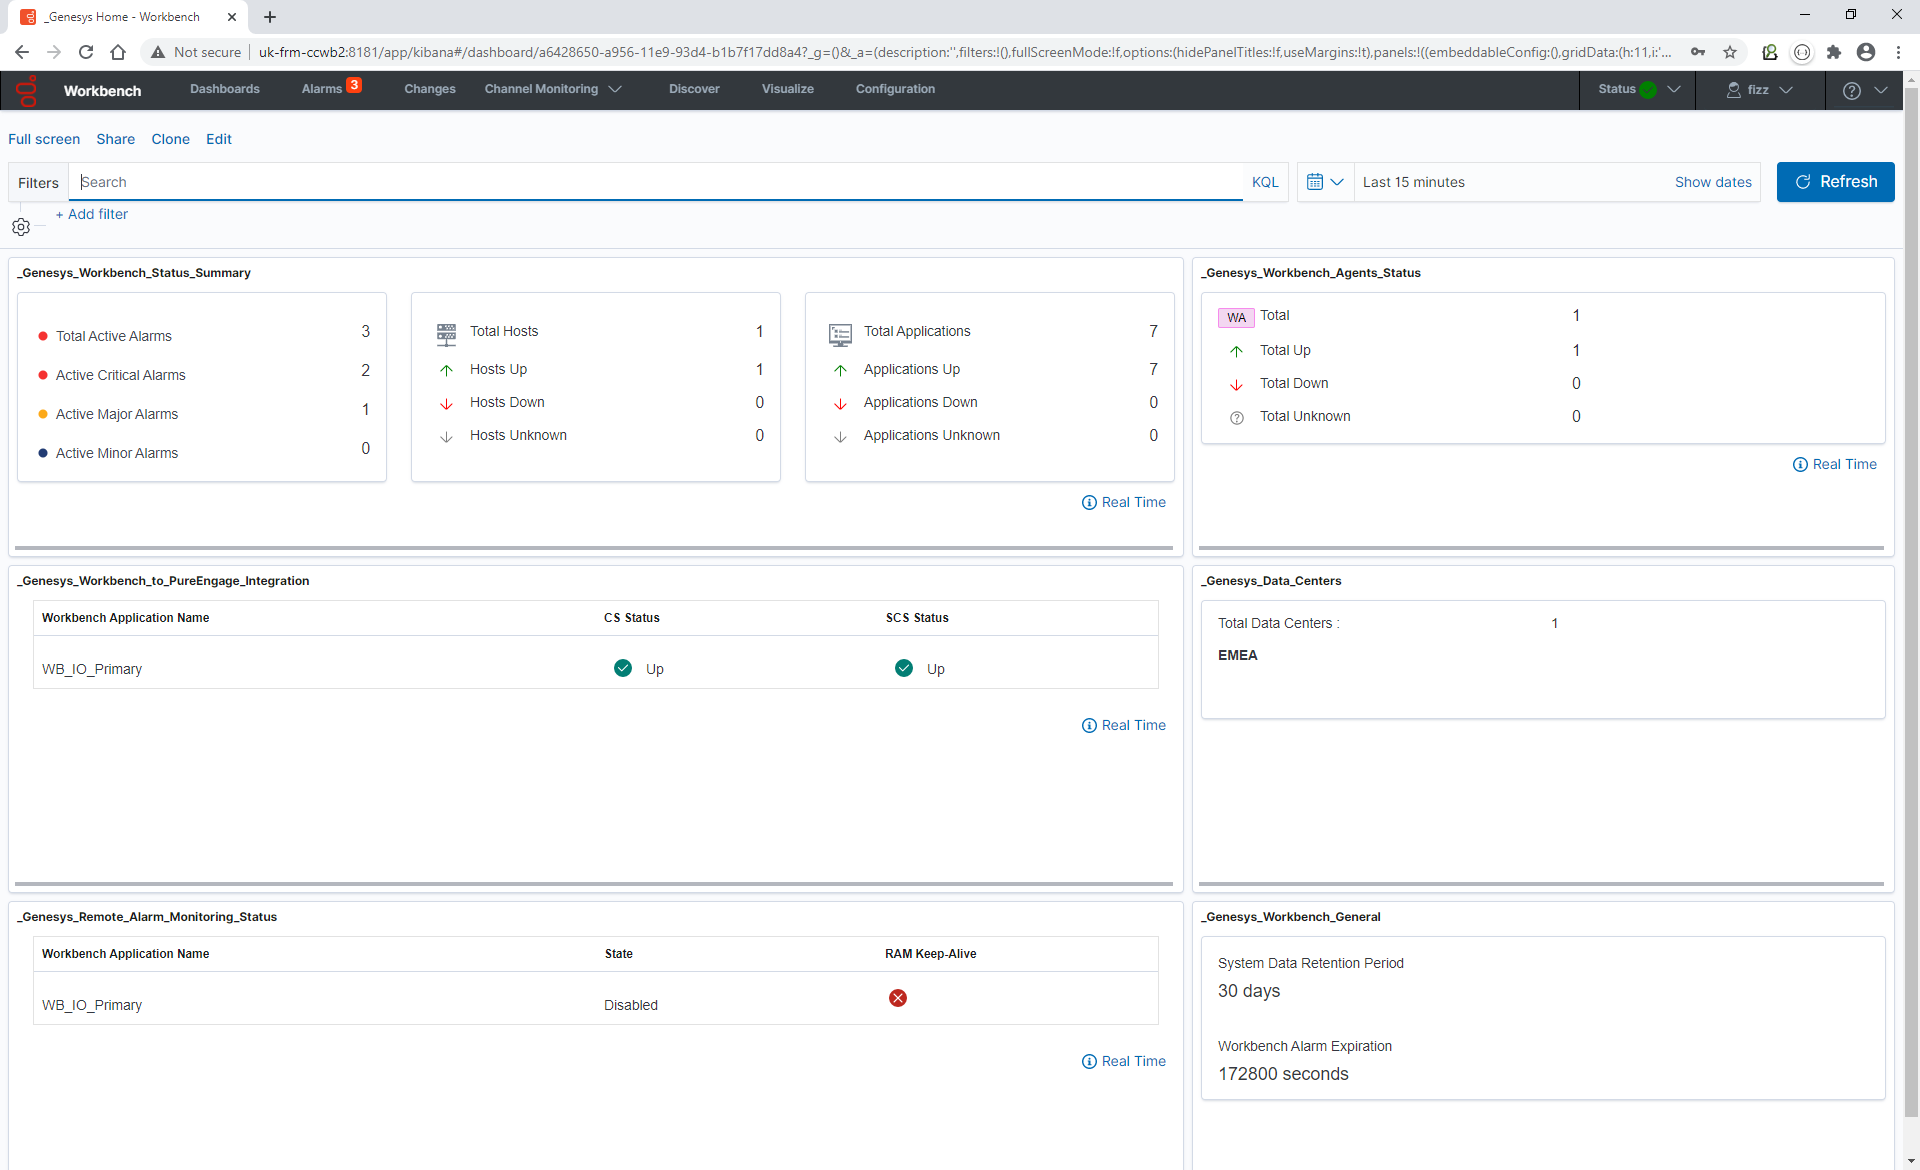
  3. You will be presented with the Home Dashboard:

Windows services that run on the primary node/host

Wb 9.1.100.00 windows services.png

Linux

The Workbench installation files will be contained in the Genesys My Portal obtained downloaded compressed file.

See also Download Workbench.

NOTE:

  • Workbench requires the installation of a Primary Node at each and every Data-Center.
  • The Workbench Primary Node must be installed prior to installing Workbench Additional Nodes.
  • Workbench ships with its own pre-bundled Java distribution, OpenJDK11; all Workbench components will be configured through the installation to use this Java distribution and should not affect any other components that may be installed on the host.
  • The Workbench installation uses the Ant Installer component, if during the Workbench installation a Network Account install is selected, the Ant Installer prints the username and password details to the "ant.install.log" file. Genesys therefore recommends, post installation, at a minimum the "ant.install.log" file be manually edited and the password be masked/deleted.
  • Use a non root account with sudo permissions when running the Workbench install.sh file.
  • If the Workbench installation is cancelled mid completion, please ensure the Workbench install directory is cleaned/purged prior to attempting another install

WARNING:

  • When installing Workbench on Linux ensure you use a non root account with sudo permissions for all the commands below - DO NOT USE THE <ROOT> ACCOUNT.
  • Workbench uses the Hostname for component configuration
  • Please ensure hostname resolution between Workbench and Engage Hosts is accurate and robust
  • If the Workbench Hosts have multiple NIC's, please ensure the Hostname resolves to the desired IP Address prior to Workbench installation

Install Workbench 9.x

  1. To extract Workbench_9.x.xxx.xx_LINUX_Pkg.tar.gz compressed file, run:
    • tar zxf Workbench_9.x.xxx.xx_LINUX.tar.gz
  2. Go to the folder:
  3. ip\linux
  4. Run:
  5. To extract the Workbench_9.x.xxx.xx_linux.tar.gz compressed tar file, run:
    • tar zxf Workbench_9.x.xxx.xx_Installer_Linux.tar.gz
  6. Run:
    • ./install.sh
    • WARNING: do not prefix with sudo.
  7. At the Welcome to Genesys Care Workbench 9.x installer prompt, press Enter.
  8. At the Press enter to view the license agreement prompt, press Enter.
  9. At the Accept Terms and Conditions prompt, press Y or Enter to accept.
  10. At the Workbench Installation Mode prompt, there are two options:
    • New Installation - no Workbench 9.x components are yet running on this host/node
    • Upgrade - you already have Workbench 9.x components running on this host/node and wish to upgrade
  11. Press Enter or 1 for New Installation.
  12. At the Workbench Installation Type prompt, there are two options:
    • Primary Node - there are currently no Workbench components running on this host/node
    • Additional Node - you're installing additional Workbench components on this host/node to form a Workbench Cluster
  13. Press Enter or 1 for Primary Node.
  14. At the PLEASE SELECT EITHER A 'DEFAULT' OR 'CUSTOM' INSTALLATION TYPE prompt, there are two options:
    • Default - the respective Workbench components Default settings will be used.
      • Default settings being binaries, paths, config, ports etc
    • Custom - or, if required, you can change the default settings by selecting a Custom install.
  15. Select whichever option best applies to your scenario.
  16. Enter a DATA-CENTER name.
    • Workbench Data-Centers are a logical concept to categorize and optimize the respective Workbench Hosts, Applications and ingested data for event distribution, visualization context and filtering purposes
    • NOTE: The Data-Center name is case-sensitive, limited to a maximum of 10, Alphanumeric and underscore characters only.
  17. Enter the Workbench component installation path (press Enter to accept the default of /opt/Genesys/Workbench_9.1.000.00).
    • The destination installation path to which the Workbench components will be copied
  18. The Hostname of the machine is displayed for reference.
  19. Enter the Total Number of Workbench Elasticsearch Nodes for this Data-Center (press Enter to accept the default of 3, which is correct even if you are deploying a single node)
  20. The Primary Components To Be Installed screen will display, denoting which components are being installed to the host/node.
  21. The PureEngage (PE) Configuration Server (CS) Settings screen will display, denoting the Engage settings to which this Workbench node will integrate too
  22. Enter the:
    • Genesys Engage Configuration Server Hostname/IP address
    • Genesys Engage Configuration Server Port (i.e. 2020)
    • Genesys Engage Workbench Server Application Name (i.e. "WB9IO")
    • Genesys Engage Workbench Client Application Name (i.e. "WB9Client")
  23. At the PureEngage Solution Control Server and Message Server Settings screen, enter the corresponding number relevant to Genesys Engage SCS and MS applications for Workbench to connect to based on the associated Configuration Server previously supplied.
  24. The installation progress screen will display, after which the installation will complete.

Initial login

  1. Go to:
    • http://<WORKBENCH_HOST>:8181
  2. Enter your login credentials.
  3. You will be presented with the Home Dashboard screen.

Services that run on the Linux host/node

The Workbench Primary node/host will contain the following Linux Services:

  • WB_Agent_9.x.xxx.xx
  • WB_Elasticsearch_9.x.xxx.xx
  • WB_Heartbeat_9.x.xxx.xx
  • WB_Kibana_9.x.xxx.xx
  • WB_Logstash_9.x.xxx.xx
  • WB_Metricbeat_9.x.xxx.xx
  • WB_ZooKeeper_9.x.xxx.xx


As an example, executing sudo service --status-all | grep WB would yield:

Status of WB_Agent_9.x.xxx.xx ...
WB_Agent_9.x.xxx.xx is running
Status of WB_Elasticsearch_9.x.xxx.xx ...
WB_Elasticsearch_9.x.xxx.xx is running
Status of WB_Heartbeat_9.x.xxx.xx ...
WB_Heartbeat_9.x.xxx.xx is running
WB_IO_9.x.xxx.xx is running (3195).
Status of WB_Kibana_9.x.xxx.xx ...
WB_Kibana_9.x.xxx.xx is running
Status of WB_Logstash_9.x.xxx.xx ...
WB_Logstash_9.x.xxx.xx is running
Status of WB_Metricbeat_9.x.xxx.xx ...
WB_Metricbeat_9.x.xxx.xx is running
Status of WB_ZooKeeper_9.x.xxx.xx ...
WB_ZooKeeper_9.x.xxx.xx is running

Workbench Visualizations is an analysis and visualization component that enables the user to create real-time and historic visualizations of ingested data; which are then used to build Dashboards to present the data.

Access Visualizations

  1. Click Visualize on the Workbench top navigation bar.

Visualizations functionality

With Visualizations you can:

  • Create new Visualizations from the shipped Genesys General and Genesys Health-Maps Visualization Types
  • Create new Visualizations from the standard Kibana Visualization Types
  • Search for Visualizations
  • Save Visualizations
  • Share Dashboards
  • Clone/Copy Visualizations
  • Edit/Customize Visualizations
  • Arrange Visualizations within the Dashboards.
  • Gain monitoring and troubleshooting insights from the shipped Visualizations and newly created Visualizations.
  • Use and learn from shipped example Visualizations.
  • View the shipped Visualizations within the shipped Dashboards.

Visualizations types

These Visualizations are included in the shipped Workbench Dashboards for context.

General

  • Alarms
    • All Source Active Alarms
    • Workbench Active Alarms
    • Genesys Engage Active Alarms
  • Changes
    • All Source Changes
    • Workbench Changes
    • Genesys Engage Changes
  • Channel Monitoring
    • Active Alarms
    • Call Flow Configuration
    • Today's Call Flow Tests Summary
  • Remote Alarm Monitoring
    • Alarms Sent to RAM Service
  • System Status & Health
    • Workbench Status Summary
    • Workbench Agents
    • Channel Monitoring
    • Remote Alarm Monitoring
    • Genesys Engage Integration
    • Data-Centers
    • Auditing
    • General
  • Workbench Summary
    • Workbench Applications
    • Workbench Hosts
  • Genesys Engage Summary
    • Genesys Engage Applications
    • Genesys Engage Hosts
    • Genesys Engage Solutions
    • Genesys Engage HA Pairs

Health-Map

  • Applications (Workbench and Genesys Engage)
  • Hosts (Workbench and Genesys Engage)
  • Genesys Engage Solutions

Create a new Health-Map

NOTE: In Workbench 9.0 Health-Maps can only be created for Genesys Engage Hosts, Applications and Solutions; Workbench Health-Maps cannot be created.

  1. Navigate to Visualize from the top Workbench navigation bar.
  2. Click the + button.
  3. Select Genesys Health-Maps.
  4. Ensure Genesys Engage Applications is selected for the Health-Map Type.
  5. Check the relevant Genesys Engage Chat Applications you want displayed in the Health-Map.
  6. Click the Apply Changes button.
  7. Click Save.
  8. Provide a Visualization name (e.g., lab_apps_HM).
  9. Click Confirm Save.
  10. Click Dashboards.
  11. Click Create new dashboard.
  12. Click Add to add a Visualization to this Dashboard.
  13. Find and click the HM_Chat_Applications.
  14. Click the X to close the Add Panels dialog.
  15. The HM_Chat_Applications Visualization has now been added to the Dashboard.
  16. Click Save.
  17. Provide a lab_apps_db and click Confirm Save.

Kibana Visualizations types

In addition to the shipped Genesys Visualization Types, the user can also leverage the standard Kibana Visualization types such as Area, Horizontal Bar, Line, Metric, Pie, etc.

NOTE: Workbench Dashboards and Visualizations leverage the Elastic Kibana component, please review the Kibana documentation for detailed guidance.

WARNING

  • It's imperative you review, plan and define the details below before installing Workbench; failure to do so could result in a Workbench re-installation
  • Review and complete each sub-section below before moving onto the next
  • Workbench can be deployed as a single-node/host or as a multi-node/host cluster.
  • The Workbench multi-node cluster deployment is available to support high-availability and/or environments that have a high volume of events/metrics.
  • Multiple Data-Centers are supported, where Workbench can be deployed as single-node/host or as a cluster per Data-Center.
  • Workbench deployments across Data-Centers can then be connected and synced in real-time to provide holistic visibility of the Alarms, Changes, Channel Monitoring and Auditing features.
  • To determine the number of Workbench nodes/hosts, and the resource requirements for each, please follow the steps below.

WARNING: The Workbench 9.x Sizing steps below should be followed for each Data-Center where Workbench will be deployed.

Calculate Workbench node/host disk space

Based on the number of Hosts (i.e. Engage SIP, URS, FWK etc) that Workbench will ingest Metric data from, review the table below to determine the respective disk space required for each Workbench Host at a given Data-Center:

Number of Hosts
  • to ingest Metric data from
Total Disk Space
  • assuming a 30 day Workbench data Retention Period and a 60 second Metric collection frequency
1-50 250 GB
51-100 500 GB
101-150 750 GB
150+ 1 TB [+250 GB for every 50 hosts > 200]

Note the Total Disk Space = ___________ (used for next steps)

WARNING

  • Currently Workbench 9.x is limited to a maximum of 100 Hosts (the global combined Workbench or Engage Hosts), the table above details beyond the 100 Host limit for future Workbench sizing context.

Only if/when the default Retention Period and Metric Frequency settings are changed

The table above assumes the Workbench default data Retention Period of 30 days and a Workbench Agent/Remote Metric collection frequency of every 60 seconds.

If these default Retention Period and Metric Frequency values require modification, please re-calculate the Total Disk Space, by using the scale factors below:

  • Retention Scale Factor = [New Retention Period Days] / 30
  • Metric Frequency Scale Factor = 60 / [New Collection Frequency Seconds]
  • Re-calculated Total Disk Space = Disk Space (from the section 1 table above) * Retention Scale Factor * Metric Frequency Scale Factor

NOTE:

  • The global Workbench Retention Period is editable via Workbench Configuration\General\Retention Period\Workbench Data Retention Period (Days)
  • The Metric Frequency collection setting can be changed on each Workbench Agent and Workbench Agent Remote application via:
    • Workbench Configuration\Applications\Application Name (i.e. WB_Agent_Primary)\MetricBeat Host Metrics\Host Metric Collection Frequency (seconds)
    • Workbench Configuration\Applications\Application Name (i.e. WB_Agent_Primary)\MetricBeat Associated Application Metrics\Application/Process Metric Collection Frequency (seconds)

Determine the node/host count

Using the Total Disk Space calculation from the previous step, next determine the required number of Workbench Nodes/Hosts:

Total Disk Space from Step 1 or 2 above Number of Workbench Nodes/Hosts Required
is less than 2.5 TB A single (1) Node/Host Workbench can be used
is greater than 2.5 TB OR if Workbench High Availability is required A 3 x Nodes/Hosts Workbench Cluster is required

NOTE:

  • Workbench High-Availability (HA) is resiliency of event data (via Workbench Elasticsearch) and configuration data (via Workbench ZooKeeper)

Node/host resources

This section details the per Workbench Node/Host recommended resources based on the previous steps:

Type Specification
Workbench Primary Node/Host
  • be it single Node or part of a 3 Node Cluster
  • CPU: 10 Cores/Threads
  • Memory: 24 GB
  • NIC: 100 MB
  • Disk:
    • if a single Workbench Node/Host = Total Disk Space from Step 1 or 2 above
    • if part of a Workbench 3 Node Cluster = divide the Total Disk Space from Step 1 or 2 above by 3
      • The Total Disk Space is divided by 3 due to the Workbench Cluster deployment architecture
Non Workbench Primary Nodes/Hosts
  • that are part of a Workbench Cluster
  • CPU: 10 Cores/Threads
  • Memory: 16 GB
  • NIC: 100 MB
  • Disk: Total Disk Space from Step 1 or 2 above / 3
      • The Total Disk Space is divided by 3 due to the Cluster deployment architecture

NOTE:

  • The following Memory allocation is need for each Workbench Elasticsearch Node/Host in the deployment.
  • Please review ES Heap Settings for details on configuring the RAM for each Workbench Elasticsearch instance.
Total Disk Space per Node/Host Dedicated Workbench Elasticsearch Memory Required
< 100 GB 2 GB RAM
100 - 750 GB 4 GB RAM
750 - 1.5 TB 6 GB RAM
1.5 - 2.5 TB 8 GB RAM

NOTE:

  • If/when Total Disk Space is greater than 2.5 TB per Node/Host, please raise a Genesys Customer Care Case for consultation/guidance.

Required number of additional node(s)/host(s) at each Data-Center

Workbench currently supports ingesting Metric data from a maximum of 100 Hosts.

Required Number of WB additional Nodes/Hosts Number of Hosts sending Metric data to Workbench Frequency of Metrics being sent from each Host to Workbench
0 (WB on Primary host) 100 60 (default)
1 (WB on Primary host and Logstash on the additional node) 100 30
1 (WB on Primary host and Logstash on the additional node) 100 10

Example 1: Ingest from 10 hosts - 30 day retention period - 60 second metric frequency

A production Workbench deployment ingesting Metric data from 10 Engage Hosts:

  • Number of Hosts to ingest Metric data from = 10
  • Retention Period = 30 days (default)
  • Metric Frequency Collection = 60 seconds (default)
  • Total Disk Space = 250 GB
  • 1 x Workbench Node/Host
    • CPU: 10 Cores
    • RAM: 24 GB
    • NIC: 100 MB
    • DISK: 250 GB
    • DEDICATED Elasticsearch RAM: 4 GB

Example 2: Ingest from 30 hosts - 7 day retention period - 10 second metric frequency

A production Workbench deployment ingesting Metric data from 30 Engage Hosts:

  • Number of Hosts to ingest Metric data from = 30
  • Retention Period = 7 days
    • therefore re-calculated Retention Scale Factor is 7 (days) / 30 => 0.23
  • Metric Frequency Collection = 10 seconds
    • therefore re-calculated Metric Frequency Scale Factor is 60 / 10 => 6
  • Re-calculated Total Disk Space is 250 GB * 0.23 * 6 => 345 GB
  • 1 x Workbench Node/Host
    • CPU: 10 Cores
    • RAM: 24 GB
    • NIC: 100 MB
    • DISK: 345 GB
    • DEDICATED Elasticsearch RAM: 4 GB

Example 3: Ingest from 90 hosts - 90 day retention period - 30 second metric frequency

A production Workbench HA deployment ingesting Metric data from 90 Engage Hosts:

  • Number of Hosts to ingest Metric data from = 90
  • Retention Period = 90 days
    • therefore re-calculated Retention Scale Factor is 90 (days) / 30 => 3
  • Metric Frequency Collection = 30 seconds
    • therefore re-calculated Metric Frequency Scale Factor is 60 / 30 => 2
  • Re-calculated Total Disk Space is 500 GB * 3 * 2 => 3000 GB (3 TB)
  • 3 x Workbench Nodes/Hosts required given Total Disk Space is greater than 2.5 TB
  • Workbench Primary
    • CPU: 10 Cores
    • RAM: 24 GB
    • NIC: 100 MB
    • DISK: 1000 GB (1 TB on each Node/Host given the Cluster architecture)
    • DEDICATED Elasticsearch RAM: 8 GB
  • Workbench Nodes 2 and 3
    • CPU: 10 Cores
    • RAM: 16 GB
    • NIC: 100 MB
    • DISK: 1000 GB (1 TB on each Node/Host given the Cluster architecture)
    • DEDICATED Elasticsearch RAM: 8 GB

Workbench Host/Server Operating System requirements

Platform Version
Microsoft Windows Server 2012
Microsoft Windows Server 2016
Red Hat Enterprise Linux (RHEL) 7
CentOS 7

Workbench 9.x comprises several components; a network Admin-level account is required that has Full Control permissions for all Workbench application related folders.

WARNING

  • The Workbench Primary and Additional (e.g., Node2 and Node3) hosts/nodes (across ALL Data-Centers) should all be running the same Operating System.
  • Workbench uses the Hostname for component configuration
  • Please ensure DNS hostname resolution between the Workbench Hosts and the Engage Hosts is accurate and robust
  • If the Workbench Hosts have multiple NIC's, please ensure the Hostname resolves to the desired IP Address prior to Workbench installation
  • Workbench 9.x is limited to a maximum of 100 Hosts (the global combined Workbench or Engage Hosts), due to delays in loading the Configuration Host and Application objects/details; this limitation will be addressed in the next release of Workbench.

Supported browsers

  • Google Chrome

Workbench 9 to Engage integration

Genesys recommends Engage Configuration Server, Solution Control Server, Message Server and SIP Server versions of 8.5+.

WARNING

  • If your Engage Configuration Servers are configured for HA, please ensure the respective CME Host Objects have the IP Address field configured, else Workbench will fail to install.
  • Ensure each and every Engage CME Application has an assigned Template else the Workbench installation will fail.
  • Genesys support for the platform versions mentioned on this page ends when the respective vendors declare End of Support.

WARNING

  • Currently Workbench Agent 9.x uses Port 5067 - this unfortunately clashes with GVP - if your Genesys deployment contains GVP please change the Workbench Agent(s) Port (e.g., to 5068) and restart the Workbench Agent(s) and Workbench Logstash(s) components.
    • This oversight will be addressed in a future Workbench 9.x release

Java requirements

Workbench 9.x ships/installs with a pre-bundled OpenJDK 11 package, therefore the historical JRE is not mandatory.

NOTE:

  • the Workbench Agent that gets installed on the Workbench Nodes/Hosts utilizes the pre-bundled OpenJDK 11 package
  • the Workbench Agent (Remote, WAR) that's installed on “remote” Nodes/Hosts (i.e. SIP, URS, FWK etc) is Go based and therefore does not rely on either OpenJDK or the historical JRE packages

WARNING

  • If the JAVA_OPTS settings are changed, ensure the xms and xmx values are different; if the values are the same issues will be encountered when starting Logstash

Network ports - Workbench hosts

Workbench components use the network ports below, from a firewall perspective, please review, edit and ensure not already in use.

WARNING

  • Double-check, these network ports below, that are used by Workbench, are from a firewall perspective, open and not already in use by other applications

Workbench Host Ports (i.e. the Primary, Node 2, Node 3, Node N etc hosts)

Port Component Comments
81822552 Workbench IO
  • Mandatory to open in firewall for Workbench Users connecting to the Workbench UI
  • Ports 8182 & 2552 can be changed (select custom install to change from these defaults) at install time
  • Ports 8182 & 2552 ports cannot be changed via the WB UI post install
8181 Kibana
  • Mandatory to open in firewall for Workbench Users connecting to the Workbench UI
  • Port 8181 can be changed (select custom install to change from these defaults) at install time
  • Port 8181 can be changed via the WB UI post install
90915067 Workbench Agent & Metricbeat
  • Only publicly open in the firewall on the Workbench host if/when using a Workbench Cluster
  • Ports 9091 & 5067 can be changed (select custom install to change from these defaults) at install time
  • Ports 9091 & 5067 can be changed via the WB UI post install
9200, 9300 Elasticsearch
  • Only publicly open in the firewall on the Workbench host if/when using a Workbench Elasticsearch Cluster
  • Port 9200 can be changed via the WB UI post install
  • Port 9300 cannot be changed via the UI post install
9600 Logstash
  • Only publicly open in the firewall on the Workbench host if/when using:
    • Workbench Cluster
    • Workbench Agent Remote components installed on Engage hosts
  • Port 9600 can be changed via the WB UI post install
5047 Logstash Status Pipeline (all ports can be changed via the WB UI)
  • Only publicly open in the firewall on the Workbench host if/when using:
    • Workbench Cluster
    • Workbench Agent Remote components installed on Engage hosts
  • Port 5047 can be changed (select custom install to change from these defaults) at install time
  • Port 5047 can be changed via the WB UI post install
5048 Logstash Metrics Pipeline (all ports can be changed via the WB UI)
  • Only publicly open in the firewall on the Workbench host if/when using:
    • Workbench Cluster
    • Workbench Agent Remote components installed on Engage hosts
  • Port 5048 can be changed (select custom install to change from these defaults) at install time
  • Port 5048 can be changed via the WB UI post install
5077 Heartbeat HTTP Port (all ports can be changed via the WB UI)
  • Only publicly open in the firewall on the Workbench host if/when using:
    • Workbench Cluster (all ports can be changed via the WB UI)
    • Workbench Agent Remote components installed on the Engage hosts
  • Port 5077 can be changed (select custom install to change from these defaults) at install time
  • Port 5077 can be changed via the WB UI post install
2181, 2888, 3888 ZooKeeper
  • Only publicly open in the firewall on the Workbench host if/when using Workbench ZooKeeper Cluster
  • Ports 2181, 2888 and 3888 can be changed via the WB UI post install

Network ports - Non-Workbench hosts (e.g., SIP, URS, FWK, etc.)

NOTE: The ports below can be edited via the Workbench Configuration Console through the respective Workbench application object

WARNING: Ensure the Ports are reviewed, edited, opened and not in use prior to starting the Workbench installation

Port(s) Component
90915067 Workbench Agent & Metricbeat on the remote Engage (i.e. SIP, URS, FWK etc Hosts)
   
  • Workbench Agent/Metricbeat installed on the Genesys Application Servers will send metric data to the local WB Data-Center instance/Cluster

Hardware sizing requirements

Please review What hardware size should I use for Workbench.

Linux pre-installation steps

For Linux based installations, some Operational System settings are required to enable support of Elastic Search, a key components of Workbench 9.

  1. Run the command:
    • ulimit -a
  2. This should print something like the following:
         bash-4.2$ ulimit -a
         core file size (blocks, -c) 0
         data seg size (kbytes, -d) unlimited
         scheduling priority (-e) 0
         file size (blocks, -f) unlimited
         pending signals (-i) 31152
         max locked memory (kbytes, -l) 64
         max memory size (kbytes, -m) unlimited
         open files (-n) 8192
         pipe size (512 bytes, -p) 8
         POSIX message queues (bytes, -q) 819200
         real-time priority (-r) 0
         stack size (kbytes, -s) 8192
         cpu time (seconds, -t) unlimited
         max user processes (-u) 4096
         virtual memory (kbytes, -v) unlimited
         file locks (-x) unlimited
  3. Make the following changes:
    1. Run the command
      • sudo vi /etc/security/limits.con
    2. Add the following lines to the bottom. <username> is the current username.
      • <username> - nofile 131070
      • <username> - nproc 8192
      • <username> - memlock unlimited
    3. Logout and log back in.
    4. Run the command:
      • sudo sysctl -w vm.max_map_count=262144
    5. Run the command:
      • sudo vi /etc/sysctl.conf
    6. Add the line vm.max_map_count=262144 to the bottom.
  4. Exit the current terminal window and open a new one.
  5. Run the command:
    • ulimit -a
  6. This should print something like the following:
         bash-4.2$ ulimit -a
         core file size (blocks, -c) 0
         data seg size (kbytes, -d) unlimited
         scheduling priority (-e) 0
         file size (blocks, -f) unlimited
         pending signals (-i) 31152
         max locked memory (kbytes, -l) 64
         max memory size (kbytes, -m) unlimited
         open files (-n) 131070
         pipe size (512 bytes, -p) 8
         POSIX message queues (bytes, -q) 819200
         real-time priority (-r) 0
         stack size (kbytes, -s) 8192
         cpu time (seconds, -t) unlimited
         max user processes (-u) 8192
         virtual memory (kbytes, -v) unlimited
         file locks (-x) unlimited
  7. Verify the following values match:
    • max user processes=8192
    • open files=131070

RHEL 7.x - specific steps

The following change is needed only for machines running Red Hat Enterprise Linux Server release 7.x.

For the Workbench services to start correctly after a machine reboot, it is necessary to run the following commands:

  1. Type:
    • sudo visudo
  2. Press Enter.
  3. Enter the sudo password when prompted.
  4. Change the line Defaults requiretty in the opened file to:
    • #Defaults requiretty
  5. Type:
    • :wq
  6. Press Enter to save the changes and exit.

Alternatively, upon reboot of the machine, these services can be manually started in the following sequence:

  • service WB_Elasticsearch_9.1.000.00 start
  • service WB_ZooKeeper_9.1.000.00 start
  • service WB_Kibana_9.1.000.00 start
  • service WB_Agent_9.1.000.00 start
  • service WB_IO_9.1.000.00 start

The Workbench Configuration Changes Console is a dedicated console that displays a real-time statistics summary as well as a data-table of historic Workbench and Engage Configuration Changes.

NOTE: Currently Workbench is limited to tracking/displaying Engage CME Host, Application, and Solution objects only; all other CME objects are not monitored by Workbench.

The statistics summary being Configuration Changes that occurred Today, Yesterday, This Week, Last Week, This Month, Last Month for:

  • All Source Changes; Changes from Workbench and Engage
  • Workbench Changes; Changes only from Workbench
  • Genesys Engage Changes; Changes only from Engage

The Changes Console also provides a real time data-table of historic Changes, from either Workbench and Engage (All Source Changes), Workbench only Changes or Engage only Changes; the Changes data-table provides the following functionality:

  • Columns
    • Generated - the generation DateTime of this Change event
      • Note: Timestamps are stored in UTC and translated to local time based on the Users Browser Time-Zone
    • Config Object - the particular Object of this Change event
    • Changed Item - the Item of this Change event
    • New Value - the new value of this Change event
    • ChangedBy - the User who actioned the change
    • Data-Center - the associated Data-Center
    • ID - the internal ID of this Change event
    • DB ID - the internal DB ID of this Change event
  • Export
    • PDF or XLS
  • Column Visibility
    • Show/Hide columns
  • Normal/Full-Screen
  • Column Reordering
    • move columns left or right within the data-table
  • Column Search/Filter
    • Filter data-table events based on DateTime, drop-down or text searches
  • Column Sort
    • Generated and Sent to RAM Service

Changes Console ChangedBy field for Engage Changes

For the Changes Console ChangedBy field to be accurate (not N/A), the following Engage configuration is required:

  • A connection from the respective Engage Configuration Server or Configuration Server Proxy to the Engage Message Server that Workbench is connected to.
  • If not already, standard=network added to the log section of the Configuration Server or Configuration Server Proxy that Workbench is connected to.

Changes Console and Workbench Data-Center Synching

WARNING: Post a Workbench Data-Center sync, existing Workbench Changes will be synced based on the Workbench Retention Period; Engage Changes will not be synched because each Workbench Data-Center IO component has it's own integration to the Engage Configuration/Message Server components and therefore synching is not required.

Genesys Workbench (WB) 9 is a monitoring, testing, troubleshooting and remediation solution, with a suite of tools to assist with the operational monitoring, management and troubleshooting of Genesys platforms.

Please review the User Guide before installing WB.

NOTE: Prior to downloading Workbench, you must accept the Terms and Conditions.

Key features in version 9.2

  • A new Workbench UI enabling richer Dashboard and Visualization capabilities providing an at-a-glance view of Genesys platform health and status.
  • View Genesys Engage Alarms via the Workbench Alarms Console, complimenting existing products such as Genesys Administrator Extensions (GAX).
  • View Genesys Engage Changes via the Workbench Changes Console, enabling greater context and perspective of Genesys Engage Application Object changes.
  • Leverage Workbench Channel Monitoring to create and schedule voice test calls to proactively identify potential interaction and routing issues before your customers are impacted; this feature can test Genesys voice call flows ensuring your service is functioning as designed and alerting you when issues are encountered.
    • Workbench Channel Monitoring integrates directly to the Genesys SIP Server and not the SIP Server Proxy
  • Take advantage of the Workbench Remote Alarm Monitoring Service, when activated, the customers on-premise Workbench instance sends specific Alarms to Genesys Customer Care, this alarm interaction is intelligently routed to a Genesys analyst who will then proactively create a Support Case and will liaise with the customer accordingly to resolve the issue(s); the alarms can also be sent to the Genesys Mobile App if subscribed.
  • View Audits via the Workbench Configuration/Auditing Console, enabling similar context to Changes with added detail such as Workbench Login/Logout events.
  • Ingest Metric data events, via the Workbench Agent(s), for analysis, troubleshooting and operational insights
  • Explore and observe metric data event insights via Workbench Dashboards and Visualizations
  • Create your own custom metric data event Dashboards and Visualizations
  • Analyze the raw ingested metric data events via the Workbench Discover Console
  • Search/filter for particular metrics, components, values etc
  • Anomaly Detection Workbench Insights feature that will be autonomously and predictively raise anomalies based on the ingested Metric data

Current version of Workbench

Prior versions of Workbench

In specific scenarios where an older release is needed, open a request case with Product Support.

Workbench Anomaly Detection (AD) add-on

Workbench documentation

The Discover Console allows the user to explore and visualize the raw data events ingested into Workbench.

Use the Discover Console to:

  • View and analyze raw ingested document data for a given time range
  • Submit searches via the Search bar
  • Add Filters based on the fields in the document
  • View the count of ingested documents over time via the top histogram 

Access the Discover Console

  1. From the navigation bar, click Discover.
  2. Apply filters as desired.

Workbench Deployment Architecture

Workbench integrates to the Genesys Engage platform, as such the following Genesys Engage Objects will be required and leveraged by Workbench:

 
Component Description/Comments
Genesys Engage Workbench Client application/object Enables Engage CME configured Users to log into Workbench
Genesys Engage Workbench IO (Server) application/object Enables integration from Workbench to the Engage CS, SCS and MS
Genesys Engage Configuration Server application/object Enables integration from Workbench to the Engage CS; authentication and Config Changes
Genesys Engage Solution Control Server application/object Enables integration from Workbench to the Engage SCS; Alarms to WB from SCS
Genesys Engage Message Server application/object Enables integration from Workbench to the Engage MS; Config change ChangedBy metadata
Genesys Engage SIP Server application/object (optional) Enables integration from Workbench to the Engage SIP Server enabling the Channel Monitoring feature

Stand-alone/single node architecture with a single Engage Data-Center

Provides the following:

  • A Genesys Engage single Data-Center/Site (e.g., APAC) deployment
  • Workbench integrates into the Engage Master Configuration Server (CS)
  • Workbench integrates into the Engage Solution Control Server (SCS) and associated Message Server (MS)
  • The Workbench Channel Monitoring feature functions via the WB IO application integrating to the respective Engage SIP Server
  • Workbench Users connect to the Workbench Primary (WB IO application) instance and can visualize the features of WB
  • If the Workbench Agent component is installed on any Genesys Application servers (e.g., SIP, URS, FWK, etc.)
    • Metric data from those hosts will be sent to the Workbench node for storage, providing visualizations via the Workbench Dashboard feature

Cluster HA architecture with a single Engage Data-Center

NOTE: Workbench High-Availability (HA) is resiliency of event data (via Workbench Elasticsearch) and configuration data (via Workbench ZooKeeper)

Provides the following:

  • A Genesys Engage single Data-Center/Site (e.g., APAC) deployment
  • Workbench Primary node integrates into the Engage Master Configuration Server (CS)
  • Workbench Primary node integrates into the Engage Solution Control Server (SCS) and associated Message Server (MS)
  • The Workbench Channel Monitoring feature functions via the WB IO application integrating to the respective Engage SIP Server
  • Workbench Users connect into the Workbench Primary (WB IO application) instance and can visualize the features of WB
  • For HA resiliency, Workbench Node 2 contains event data (via Workbench Elasticsearch) and configuration data (via Workbench ZooKeeper)
  • For HA resiliency, Workbench Node 3 contains event data (via Workbench Elasticsearch) and configuration data (via Workbench ZooKeeper)

Cluster HA architecture with multiple Engage Data-Center (no/limited Metric ingest)

WARNING: This architecture has no\limited Engage Metric data ingestion by design.

NOTE

  • This architecture is best suited for customers who do not wish to ingest Metric data from their Genesys Application Servers (e.g., SIP, URS, FWK, etc.) but wish to leverage the other features of Workbench via a minimal HA footprint
  • The footprint could be reduced further by only deploying a Workbench Primary node at the APAC Data-Center, thereby providing no HA, but offers a minimal Workbench footprint investment.

Provides the following:

  • A Genesys Engage multi Data-Center/Site (e.g., APAC and EMEA) deployment
  • A Workbench Primary, Node 2 and Node 3 Cluster - only installed at the APAC Data-Center
  • The Workbench Primary at the APAC Data-Center integrates into the respective local Configuration Server
  • The Workbench Primary at the APAC Data-center integrates into the respective local Solution Control Server and associated Message Server
  • The Workbench Channel Monitoring feature functions via the WB IO application integrating to the respective Engage SIP Server
  • EMEA Alarms and Changes events would be ingested into the APAC Workbench Cluster via Engage CS Proxy and Distributed SCS components
  • Workbench Users at both APAC and EMEA would connect to the APAC Workbench Primary (WB IO application) instance and can visualize the features of WB
  • Workbench Agents would only be installed on the APAC Data-Center, on the Workbench Hosts by default
    • Installing the Workbench Agent Remote component on the Genesys Application Servers in the APAC Data-Center is optional
  • Workbench Agents would NOT be installed on the EMEA Data-Center - due to the network Metric event data that would transition over the WAN

Stand-alone/single node architecture with multiple Engage Data-Centers

Provides the following:

  • A Genesys Engage multi Data-Center/Site (e.g., APAC and EMEA) deployment
  • Each Workbench Primary at each Data-Center integrates into the respective local Configuration Server
  • Each Workbench Primary at each Data-center integrates into the respective local Solution Control Server and associated Message Server
  • The Workbench Channel Monitoring feature functions via the WB IO application integrating to the respective Engage SIP Server
  • Workbench Users would logically connect into their local Workbench Primary (WB IO application) instance and can visualize the features of WB
    • Workbench Users can connect into either their local or remote Data-Center Workbench instances; this provides redundancy
  • If the Workbench Agent component is installed on any Genesys Application servers (e.g., SIP, URS, FWK, etc.)
    • Metric data from those hosts will be sent to the local Workbench node/cluster for storage, providing visualizations via the Workbench Dashboard feature

Cluster architecture with multiple Engage Data-Centers

NOTE: Workbench High-Availability (HA) is resiliency of event data (via Workbench Elasticsearch) and configuration data (via Workbench ZooKeeper)

Provides the following:

  • A Genesys Engage multi Data-Center/Site (e.g., APAC and EMEA) deployment
  • Each Workbench Primary at each Data-Center integrates into the respective local Configuration Server
  • Each Workbench Primary at each Data-center integrates into the respective local Solution Control Server and associated Message Server
  • The Workbench Channel Monitoring feature functions via the WB IO application integrating to the respective Engage SIP Server
  • Workbench Users would logically connect into their local Workbench Primary (WB IO application) instance and can visualize the features of WB
    • Workbench Users can connect into either their local or remote Data-Center Workbench instances; this provides redundancy
  • If the Workbench Agent component is installed on any Genesys Application servers (e.g., SIP, URS, FWK, etc.)
    • the Metric data from those hosts will be sent to the local Workbench node/cluster for storage, providing visualizations via the Workbench Dashboard feature
  • For resiliency, Workbench Node 2 contains event data (via Workbench Elasticsearch) and configuration data (via Workbench ZooKeeper)
  • For resiliency, Workbench Node 3 contains event data (via Workbench Elasticsearch) and configuration data (via Workbench ZooKeeper)

Workbench Anomaly Detection (AD) with a Cluster HA architecture with a single Engage Data-Center

Provides the following:

  • A Genesys Engage single Data-Center/Site (e.g., APAC) deployment
  • Workbench Primary node integrates into the Engage Master Configuration Server (CS)
  • Workbench Primary node integrates into the Engage Solution Control Server (SCS) and associated Message Server (MS)
  • The Workbench Channel Monitoring feature functions via the WB IO application integrating to the respective Engage SIP Server
  • Workbench Users connect into the Workbench Primary (WB IO application) instance and can visualize the features of WB
  • For HA resiliency, Workbench Node 2 contains event data (via Workbench Elasticsearch) and configuration data (via Workbench ZooKeeper)
  • For HA resiliency, Workbench Node 3 contains event data (via Workbench Elasticsearch) and configuration data (via Workbench ZooKeeper)
  • Workbench Anomaly Detection (AD) Primary Node

Workbench Anomaly Detection (AD) HA with a Cluster HA architecture with multiple Engage Data-Centers

Provides the following:

  • A Genesys Engage multi Data-Center/Site (e.g., APAC and EMEA) deployment
  • Each Workbench Primary at each Data-Center integrates into the respective local Configuration Server
  • Each Workbench Primary at each Data-center integrates into the respective local Solution Control Server and associated Message Server
  • The Workbench Channel Monitoring feature functions via the WB IO application integrating to the respective Engage SIP Server
  • Workbench Users would logically connect into their local Workbench Primary (WB IO application) instance and can visualize the features of WB
    • Workbench Users can connect into either their local or remote Data-Center Workbench instances; this provides redundancy
  • If the Workbench Agent component is installed on any Genesys Application servers (e.g., SIP, URS, FWK, etc.)
    • the Metric data from those hosts will be sent to the local Workbench node/cluster for storage, providing visualizations via the Workbench Dashboard feature
  • For resiliency, Workbench Node 2 contains event data (via Workbench Elasticsearch) and configuration data (via Workbench ZooKeeper)
  • For resiliency, Workbench Node 3 contains event data (via Workbench Elasticsearch) and configuration data (via Workbench ZooKeeper)
  • Workbench Anomaly Detection (AD) Primary Node and Node 2 - therefore the AD feature is running in HA mode

Workbench Data-Centers

A Data-Center (DC) is a logical concept containing Workbench components that are typically deployed within the same physical location, typically within the same Data-Center or Site.

For example, a WB distributed solution, could consist of a 3x Data-Center deployment, Data-Centers APACEMEA and LATAM.

Each WB Data-Center will be running Workbench components, such as:

  • Workbench IO
  • Workbench Agent
  • Workbench Elasticsearch
  • Workbench Kibana
  • Workbench Logstash
  • Workbench ZooKeeper

When installing Workbench, the user has to provide a Data-Center name, post install, the respective Workbench components will be assigned to the Data-Center provided.

Workbench Data-Centers provide:

  • Logical separation of Workbench components based on physical location
  • Logical and optimized data ingestion architecture
    • E.g., APAC Metric data from the SIP, URS and GVP Servers will be ingested into the APAC Workbench instance/Cluster
  • An holistic view of multiple Workbench deployments at different Data-Centers, all synchronized to form a Workbench distributed architecture
    • E.g., A user can log into the APAC Workbench instance and visualize Alarms, Changes and Channel Monitoring events/data from not only the local APAC WB instance/Cluster, but also the other EMEA and LATAM Data-Centers Workbench instances

NOTE: A Workbench host object cannot be assigned to a different Data-Center. A Genesys Engage host (e.g., SIP, URS, FWK, etc.) object can be re-assigned to a different Data-Center

Important notes

Future Workbench 9.x Architectures/Footprints

  • Workbench 9.x future architectures/footprints may change when future roadmap features are released; Workbench 9.x roadmap features are subject to change, timescales TBD.

Workbench Agent and Workbench Agent Remote

  • Workbench Agent 8.5 is ONLY for LFMT
  • Workbench Agent 9.x is ONLY for Workbench 9.x Hosts
  • If/when Workbench and LFMT is deployed, both Workbench Agents 8.5 and 9.x would be needed on each remote host
    • The Workbench Agent 8.5 would be required for LFMT to collect log files from the remote hosts (e.g., sip, urs, gvp, etc.)
    • The Workbench Agent 9.x would be required for Workbench ingestion of data from the remote hosts (e.g., sip, urs, gvp, etc.)
  • Workbench Agent Remote (WAR) 9.x is ONLY deployed on remote Genesys Hosts such as e.g., sip, urs, gvp, etc. - this components sends Metric data to the Workbench 9.x Server/Cluster

Workbench Version Alignment

  • Workbench Versions on all Nodes and at all Data-Centers should be running the same release (e.g., do not mix 9.0.000.00 with 9.1.000.00.).

ZooKeeper authentication provides improved security for the back-end Workbench storage, essentially requiring a username and password to access the ZooKeeper data.

ZooKeeper authentication is not enabled by default and can be enabled through the Workbench UI post installation.

ZooKeeper handles authentication / authorization by using ACLs to specify permissions on each ZooKeeper node. Once authentication is enabled, the nodes that already exist in Zookeeper will be associated with the new user. After that, any new configuration data that is saved in ZooKeeper will be associated with the new user. In this way, only the owner can access data saved in Zookeeper and no other user can view or edit it. Disabling authentication again will disassociate the Zookeeper user from all existing data nodes and allow any user to view or edit data saved in Zookeeper.

In case a cluster of ZooKeeper nodes is desired for fault tolerance and high availability, additional nodes can be installed. If authentication has been enabled in ZooKeeper prior to installing the additional nodes, this must be first disabled. After disabling authentication, proceed with installing the additional nodes. Once the additional nodes have been installed, ZooKeeper authentication can be reenabled.

Limitations and considerations

WARNING

  • Installing ZooKeeper Additional Nodes after enabling ZooKeeper Authentication is possible, but ZooKeeper Authentication should be disabled first.
    • After disabling authentication, the additional ZooKeeper nodes can be installed
    • Once the additional ZooKeeper nodes have been installed, ZooKeeper Authentication can be re-enabled
  • While the Zookeeper Authentication enable/disable process is running, some data may appear inconsistent if you navigate to other pages in the application; to avoid this, please wait until the notification Updating ZooKeeper Data is completed appears at the bottom of the page.
  • While the ZooKeeper Authentication enablement is in progress, it is recommended to not make any other Workbench configuration changes until the Updating ZooKeeper Data is completed toast pop-up is presented, which will be ~5 minutes.
  • For multi Workbench Data-Center (i.e. APAC and EMEA) deployments with Workbench Cluster (Primary, Node 2, Node 3), when enabling/changing Workbench ZooKeeper username and password, please ensure you're logged into the respective Workbench Data-Center before making the change
    • i.e. if you have 2 x Workbench Data-Centers (i.e. APAC and EMEA) with Workbench Cluster (Primary, Node 2, Node 3) at each Data-Center, and you wish to change the EMEA Workbench ZooKeeper username and password, please ensure you're logged into the EMEA Workbench and not the APAC Workbench

Currently Workbench supports TLS connections/communication between its Workbench IO Application(s).

For example a Workbench IO Application in APAC can communicate with a Workbench IO Application in EMEA, providing secure messaging of Alarm, Changes, Channel Monitoring and Auditing events across the WAN, to enable this Workbench IO "APAC" to Workbench IO "EMEA" connection/communication, the respective Workbench Host Objects must first be TLS Enabled.

NOTE

  • TLS connections to Workbench IO and Kibana (essentially the main Workbench UI) is currently NOT supported
  • TLS connections from Workbench IO Applications at different Data-Centers is supported
  • TLS connections to Elasticsearch has to be enabled when enabling Elasticsearch Authentication
  • TLS connections to ZooKeeper is NOT supported
  • TLS connection from Workbench to Engage Configuration Server is supported
  • TLS connection from Workbench to Engage Solution Control Server is supported
  • TLS connection from Workbench to Engage Message Server is supported

Enable TLS on the Workbench host

Only enable the Workbench Host TLS setting if/when Workbench IO Application TLS connection/communication is preferred between Workbench IO Applications at different Data-Centers (i.e. "APAC" and "EMEA") for improved security; complete this Workbench Host TLS enablement before enabling Workbench IO Application TLS or Workbench ElasticSearch Authentication is planned to be enabled; complete this Workbench Host TLS enablement before enabling ElasticSearch Authentication.

  1. Certificates need to be in a Java Key Store (.jks file) and accessible on the host by the user account running Workbench.
  2. Within Workbench, browse to the Configuration > Hosts section and select the host that TLS will be enabled on.
  3. Within the host object settings, navigate to the "2. Workbench TLS Communication" section.
  4. Populate the following options:
    • Keystore Path: path of the Java Key store on the host
    • Keystore Password: password for the key store
    • Truststore Path: path to the Java trust store
    • Truststore Password: password for the Java trust store
    • Protocol (default: TLSv1.2): TLS protocol that will be used
    • Algorithms: comma-delimited list of cipher suites that the host will use for TLS negotiation/communication with other nodes
    • Mutual-TLS: check to enable mutual TLS
  5. Click the save button to commit the changes.

Enable TLS in the IO application

Only enable the Workbench IO Application TLS setting if/when TLS connection/communication is preferred between Workbench IO Applications at different Data-Centers for improved security

  1. Ensure that the TLS properties have been first configured for the host object that the Workbench_IO application is running on (See the above Enable TLS on the Workbench host section).
  2. Within Workbench, browse to the Configuration > Applications section and select the Workbench_IO application in the list that TLS will be enabled on.
  3. With the Workbench_IO application object, navigate to the 9. Workbench Distributed Mode section.
  4. Check the TLS Enabled property.
  5. Click Save to commit the changes.
  6. Restart the Workbench_IO service for changes to take effect.

Enable TLS in the ElasticSearch application (only if enabling Elastic Authentication)

Only enable the ElasticSearch Application TLS setting if/when Workbench ElasticSearch Authentication is planned to be enabled.

NOTE: It is important to complete this ElasticSearch TLS enablement before enabling ElasticSearch Authentication

  1. Ensure that the TLS properties have been first configured for the host object that the ElasticSearch node is running on (see the Enable TLS on the Workbench host section).
  2. On the host in which the ElasticSearch node is running, place a copy of the key store and trust store in the following directory:
    • {WBInstallDirectory}/ElasticSearch/config
  3. Within Workbench, browse to the Configuration > Applicationssection and select the ElasticSearch application in the list that TLS will be enabled on.
  4. With the ElasticSearch application object, navigate to the 8.Workbench Elasticsearch Authentication section.
  5. Enable the authentication and specify the desired username and password.
  6. Click Save to commit the changes.

Workbench-to-Engage TLS

Workbench supports TLS connections to the following Genesys Framework components:

  • Configuration Server
  • Message Server
  • Solution Control Server

To setup/enable TLS for each of these components, please follow the Genesys Security guide at the following location to configure TLS:

Ensure that the certificates are installed on the Workbench Server host/VM to enable connectivity to the Framework components.

NOTE: For Windows VMs/Hosts ensure that the certificates are installed for both the user running the Workbench installation as well as the LOCAL_SYSTEM account that will be running the Workbench Services.

Once the framework components and the respective hosts/VMs have been configured to use TLS, the provisioned Workbench Server application in Configuration Server will also need to be configured with the TLS properties to connect to each of the Framework components.

Configuration server

During Workbench installation, when prompted to specify the Configuration Server details, make sure to specify the auto-upgrade port that is defined for the Configuration Server instance.

NOTE: If Workbench was originally installed using a non-secure port of Configuration Server, the following file can be updated within the Workbench installation directory to change the port to an auto-upgrade port:

  • {WbInstallDir}/karaf/etc/ConfigServerInstances.cfg


Within this file, update the port for the primary Configuration Server.  After the file is updated, restart the Workbench_IO to use the new Configuration Server settings.

Solution control server

  1. During Workbench installation you will be prompted to select the Solution Control Server instance the Workbench will connect to subscribe to framework events.
  2. From within Genesys Administrator or Genesys Administrator Extension (GAX), ensure that the provisioned Workbench Server application object has a connection to both the primary and backup (if applicable) Solution Control Server and that the secure port is selected when adding these connections.  Workbench will use this port when connecting to Solution Control Server.

Message server

  1. During Workbench installation you will be prompted to select the Message Server instance that Workbench will connect to subscribe to framework events.
  2. From within Genesys Administrator or Genesys Administrator Extension (GAX), ensure that the provisioned Workbench Server application object has a connection to the primary and backup (if applicable) Message Servers and that the secure port is selected when configuring these connections.  Workbench will use this secure port when connecting to Message Server.

Windows

Stop the Workbench Services in this order

  • Genesys Workbench.IO 9.x.xxx.xx
  • Genesys Workbench Kibana 9.x.xxx.xx
  • Genesys Workbench Metricbeat 9.x.xxx.xx
  • Genesys Workbench Elasticsearch 9.x.xxx.xx
  • Genesys Workbench ZooKeeper 9.x.xxx.xx
  • Genesys Workbench Agent 9.x.xxx.xx
  • Genesys Workbench Logstash 9.x.xxx.xx
  • Genesys Workbench Heartbeat 9.x.xxx.xx

Start the Workbench Services in this order

  • Genesys Workbench.IO 9.x.xxx.xx
  • Genesys Workbench Elasticsearch 9.x.xxx.xx
  • Genesys Workbench ZooKeeper 9.x.xxx.xx
  • Genesys Workbench Kibana 9.x.xxx.xx
  • Genesys Workbench Logstash 9.x.xxx.xx
  • Genesys Workbench Metricbeat 9.x.xxx.xx
  • Genesys Workbench Agent 9.x.xxx.xx
  • Genesys Workbench Heartbeat 9.x.xxx.xx

Linux

Stop the Workbench Services in this order

  • WB_IO_9.x.xxx.xx
  • WB_Kibana_9.x.xxx.xx
  • WB_Metricbeat_9.x.xxx.xx
  • WB_Elasticsearch_9.x.xxx.xx
  • WB_ZooKeeper_9.x.xxx.xx
  • WB_Agent_9.x.xxx.xx
  • WB_Logstash_9.x.xxx.xx
  • WB_Heartbeat_9.x.xxx.xx

Start the Workbench Services in this order

  • WB_IO_9.x.xxx.xx
  • WB_Elasticsearch_9.x.xxx.xx
  • WB_ZooKeeper_9.x.xxx.xx
  • WB_Kibana_9.x.xxx.xx
  • WB_Logstash_9.x.xxx.xx
  • WB_Metricbeat_9.x.xxx.xx
  • WB_Agent_9.x.xxx.xx
  • WB_Heartbeat_9.x.xxx.xx

The Workbench Alarm is a dedicated console that displays a real-time statistics summary of active alarms, as well as a real-time data-table of active and historic alarms.

The statistics summary displays Total, Critical, Major and Minor metrics for:

  • All Source Active Alarms - from Workbench and Genesys Engage
  • Workbench Active Alarms - from only Workbench
  • Genesys Engage Active Alarms - from only Genesys Engage

The real time data-table displays the below listed details of all alarms, be those active or closed. Every column is provided with a sorting/searching option based on its data type, which makes the alarm identification much easier.

The different data information of an alarm is segregated as columns in the data-table.

  • Generated - The date and time of an alarm generation.
    • NOTE: Timestamps are stored in UTC and translated to local time based on the Users Browser Time-Zone
  • Status - Indicates if the alarm event status is Active/Closed.
  • Severity - Denotes the severity of the alarm event. It can be Critical, Major or Minor.
  • Alarm Message - The message about the alarm event in text format.
  • Host - The name of the Host/Server associated to the alarm event.
  • Application - The name of the application associated to the alarm event.
  • Data-Center - The name of the Data-Center associated to the alarm (Workbench only not Engage) event.
  • Sent to RAM Service - The date and time by when the alarm event was sent to the Genesys Remote Alarm Monitoring (RAM) Service.
  • Expiration - The time (in seconds) by when the alarm event will automatically expire/clear.
  • Cleared - The date and time at when the alarm event was cleared.
  • ID - The internal ID of the alarm event.

The real time data-table is also equipped with the following buttons for easy sort, filter and export options.

  • Show only Active Alarms - A filter to show only the active alarms available
  • Export - Gives the option to export the data-table in either PDF or Excel format
  • Column Visibility - Gives the option to show/hide the columns that you prefer.
  • Normal/Full-Screen - To toggle between the normal and full screen mode.
  • Column Reordering - Allows to move columns left or right within the data-table.
  • Column Search/Filter - Filter data-table events based on Date & Time, drop-down filter or text searches
  • Column Sort - Generated and Sent to RAM Service

An example Workbench Alarm Console shown below:

Alarm Console and Workbench Data-Center Synching

WARNING: Post a Workbench Data-Center sync, only Active Alarms will be synced; Engage Alarms are not synched because each Workbench Data-Center IO component has it's own integration to the Engage Solution Control Server (SCS) component and therefore synching is not required.

By default, the Start Page is set to the Home Dashboard with the following information:

  • Workbench Status Summary
  • Workbench Hosts Status Summary
  • Workbench Application Summary
  • Wokrbench Agent Status Summary
  • Workbench to Genesys Engage Integration Summary
  • Workbench Channel Monitoring Status Summary
  • Workbench Data-Center Summary
  • Workbench Remote Alarm Monitoring (RAM) Status Summary
  • Workbench General Information Summary

Start page options

Workbench enables users to configure their Start Page via the User Preferences navigation bar option.

Here you can select and configured the following options:

  • Home Dashboard
  • Dashboards
  • Alarms
  • Changes
  • Channel Monitoring
  • Discover
  • Visualize
  • Configuration

Workbench IO

This component ingests data from multiple data sources such as Genesys Engage Configuration Server (CS), Genesys Engage Solution Control Server (SCS), Genesys Engage Message Server (MS) enabling the user to visualise health, status (via Dashboards, Visualizations, Health-Maps, Alarms/Changes Consoles) and troubleshoot their Genesys platform.

Workbench Agent (WB Hosts)

This component is installed on each and every Workbench host where Workbench components are installed. The WBAgent in 9.0 is used for deployment, configuration, status and control of the Workbench components.

Workbench Agent Remote (non WB Hosts)

This component is installed on each Engage (i.e. non Workbench host) where you wish to send metric events to the Workbench node/Cluster; this then enables observability of host and process CPU, Memory, Disk and Network metric data, providing rich insights and analysis capability into host and process metric utilization, performance and trends.

Workbench Kibana

This component is the Workbench Client, providing the Workbench UI where users can leverage dedicated Alarms, Changes, Audit and Discover Consoles, Channel Monitoring Call Flows, Dashboards and Visualizations, Health-Maps etc to monitor and troubleshoot their Genesys Engage platform.

Workbench Elasticsearch

This component is the data event storage feature of Workbench providing a full-text search engine. Alarm, Configuration Change, Channel Monitoring event, Auditing event and Metric event data are all stored within Workbench Elasticsearch.

Workbench Logstash

This component is a server side ETL data processing pipeline that enables data collection (from a variety of sources i.e. Workbench Agent, Workbench Heartbeat and Workbench Elasticsearch), data transformation and subsequent destination storage (i.e. Workbench Elasticsearch).

Workbench Heartbeat

This component is used for Workbench component health and status monitoring

Workbench Metricbeat

This component is used for Metric (i.e. Cpu, Memory, Disk, Network) data collection from Workbench and Genesys Application Servers (i.e. SIP, URS, GVP etc).

Workbench ZooKeeper

This component provides and stores Workbench configuration data such as Hosts, Applications, Channel Monitoring configuration, User Preferences etc.

Workbench Agent and Workbench Agent Remote

  • Workbench Agent 8.5 is ONLY for LFMT
  • Workbench Agent 9.x is ONLY for Workbench 9.x Hosts
  • If/when Workbench and LFMT is deployed, both Workbench Agents 8.5 and 9.x would be needed on each remote host
    • The Workbench Agent 8.5 would be required for LFMT to collect log files from the remote hosts (i.e. sip, urs, gvp etc)
    • The Workbench Agent 9.x would be required for Workbench ingestion of data from the remote hosts (i.e. sip, urs, gvp etc)
  • Workbench Agent Remote (WAR) 9.x is ONLY deployed on remote Genesys Hosts such as SIP, URS, GVP etc - this components sends Metric data to the Workbench 9.x Server/Cluster

Elastic Stack

Details of the Elastic stack components that are leveraged by Workbench 9.x can be found at: 

NOTE

  • If any Workbench data is required for archival purposes, please ensure it is saved at a separate location prior to running the Workbench uninstall script(s).
  • The Workbench uninstall process permanently removes the Workbench Services associated with all the Workbench components and all files, including data and logs, etc.
  • The uninstall process will leave the original configuration file used to generate the Workbench installation; if needed, this can be provided to Genesys Customer Care if related to an installation issue.
  • The Workbench uninstallation should be done in reverse Workbench installation order.
    • If permanently removing Workbench and you no longer wish to use Workbench.
      • uninstall any Workbench Agents running on remote Genesys Application Servers (i.e. SIP, URS, FWK etc).
    • Uninstall any Workbench Additional nodes.
    • Uninstall the Workbench Primary node.

Windows

  1. Browse to the Workbench home installation folder (i.e. "C:\Program Files\Workbench_9.x.xxx.xx").
  2. Open a Command/Powershell Console as an Administrator.
  3. Run uninstall.bat file.
  4. Remove any remaining files/folders from and including the Workbench "Home" installation folder.
  5. This completes the Workbench Linux uninstall process.

Linux

  1. Via a Linux Terminal, cd (Change Directory) to where Workbench is installed (i.e. /opt/Genesys/Workbench_9.x.xxx.xx).
  2. Run ./uninstall.sh as a User with Administrator permissions - not as "root".
  3. Remove any remaining files/folders from and including the Workbench "Home" installation folder.
  4. This completes the Workbench Linux uninstall process.

Workbench Dashboards are a placeholder for a collection of Visualizations that display health, status and event data.

Workbench Dashboards provide at-a-glance insights into data that has been ingested from your Engage platform as well as Workbench related data and events.

To view Dashboards, click Dashboards on the navigation bar; post installation Dashboards (11) contain shipped examples to view and use, detailed below:

With Dashboards you can:

  • Create new Dashboards
  • Search for Dashboards
  • Share Dashboards
  • Clone/Copy Dashboards
  • Edit/Customize Dashboards
  • Full-Screen Dashboards
  • Arrange Visualizations within the Dashboards.
  • Gain monitoring and troubleshooting insights from the shipped Dashboards and newly created Dashboards.
  • Use and learn from shipped example Dashboards.
  • View the shipped Visualizations within the shipped Dashboards.

Genesys Home Dashboard

Workbench ships with a Genesys Home Dashboard; this Dashboard contains several shipped Visualizations providing key information such as:

  • Workbench Status Summary
  • Workbench Agent Status
  • Workbench to Genesys Engage Integration Status
  • Workbench Data Centers
  • Workbench Remote Alarm Monitoring Status
  • Workbench General Settings

Metrics Overview Example Dashboard

Workbench 9.1 adds a Metric data ingestion feature that enables observability of host and process CPU, Memory, Disk and Network metric data, providing rich insights and analysis capability into host and process metric utilization, performance and trends.

NOTE: Workbench Dashboards and Visualizations leverage the Elastic Kibana component, please review Kibana documentation for further detailed guidance.

  1. Once Workbench has been successfully installed, go to:
    • http://<Enter WB_HOST here>:8181
  2. At the Welcome to Workbench prompt, enter your Engage Configuration Server credentials.
         
  3. You will be presented with the Workbench Home Dashboard by default. You can change this in User Preferences.

Announcements