"How To" Articles

My Support functions for each level of access

Levels of access are listed below from least amount of access to most. In each subsequent level after Basic, new access permissions are in bold type.

Basic

  • Log into My Support Portal
  • Register and attend live Tech Tutorials
  • View and download recorded Tech Tutorials
  • Search, view and download Knowledge Base content

Read-Only

  • Log into My Support Portal
  • Register and attend live Tech Tutorials
  • View and download recorded Tech Tutorials
  • Search, view and download Knowledge Base content
  • View existing Cases

Read-Write (Designated Contact)

  • Log into My Support Portal
  • Register and attend live Tech Tutorials
  • View and download recorded Tech Tutorials
  • Search, view and download Knowledge Base content
  • View existing Cases
  • Create new Cases, modify existing Cases, submit Feature Requests
  • Download software and order controlled software

Request an account

If you do not currently have an account on the My Support Portal, see Create a My Support Account for instructions on how to request one.

Request a different level of access

NOTE: If you are a member of an organization that has purchased Genesys products from one of our Genesys Partners, then your Designated Contact is a member of that Partner organization. However, you can still request Read-Only access using the process below. For more information on this, see: How a Genesys Partner Serves as Designated Contact for Their Customers.

  1. Login to the Support Portal. You will automatically be directed to the My Support Cases page.
  2. Click on your name in the upper right-hand corner of the page.
    • A screenshot of the Support Portal with a large orange arrow pointing to the words, "Welcome back, Matt Ryan."
  3. Click My Support Access from the drop-down menu.
  4. Complete the Request Additional Access form.
    • NOTE: If you are a member of a Genesys Partner organization and you are requesting Designated Contact status for one of your customers, in the Company/Partner Combinations (End User/Sold To) box, enter your Company name, the names of the companies/accounts you manage (if applicable), and corresponding Org IDs. If you need help locating an Org ID, go here. The Portal Admin team will seek approval from your company’s Designated Approver(s). Once approved, you will receive an email from donotreply@genesys.com with instructions.
  5. Click Submit Request.
  6. Please allow 48 hours or 2 business days for Product Support to process the request.
  7. A Product Support Admin may contact you by phone or email to obtain additional information.

  1. Navigate to: 
  2. Click the GET STARTED tab. 
  3. Click the Request My Support Account button. 
  4. You will be asked to supply your corporate email address. 
  5. You will be asked to specify which level of access you are requesting.
  6. There are three levels of access:
    • Basic
    • Read-Only
    • Read-Write (Designated Contact)
  7. If you are not certain which level of access is appropriate for your role, see My Support Access Levels.

If a case submitted to Product Support needs the engagement of Development, Cloud Operations, or a 3rd party, it may need more time to resolve pending their analysis and findings.

Criteria for additional help

The following criteria must be met for an escalation request to be approved.

  1. There must be an active case. There must be an existing case open before additional help can be requested. 
  2. Double-check the case. Has there been a recent update to the case that you may have missed? Is Product Support waiting on more information from you before they can proceed?
  3. Additional help should not be requested for RCA (Root Cause Analysis) for Cloud Platform outages unless Product Support has had 5 business days to complete analysis for cloud deployments, per our standard Service Level Targets for RCA delivery. See PureConnect Direct Customer HandbookPureConnect Partner Handbook, or Cloud CX Handbook.
    • NOTE - After service is restored for severity 1 platform-level incidents, Genesys strives to provide a comprehensive RCA document to affected customers within five (5) business days.
  4. Additional help for high-priority cases need 24 hours since their last update, and the issue is actively causing significant business impact.
  5. Low-priority cases are not eligible for additional help.
    • To change a case to medium-priority, request the change in the work notes.
    • To change a case to high-priority, contact Product Support.


Critical commercial issues (non-FedRAMP)

Critical issues, like production down, may need management attention. The support expert assigned to your case will engage a Product Support Manager.

IMPORTANT - Do not request assistance for urgent issues via email, chat, or web as it leads to a delayed response in resolving your issue.

  1. Contact Product Support.

Non-critical commercial issues (non-FedRAMP)

  1. From the Support Portal portal, select a case.
  2. In the lower right of the case page, click Additional Help.
    • A screenshot of a case in the Support Portal. A large orange arrow points to the Additional Help button.
  3. If the Additional Help button is unavailable, an open request likely exists for the case.
    • A close up screenshot of a portion of a case in the Support Portal. The Escalate button is grayed out and there is an explanation displayed after it, explaining that the case cannot be escalated because it is a low priority case.

Management process

  1. Customer or Partner requests Additional Help.
  2. If an Escalation is generated - the Escalation Owner reviews the request and determines if it meets the Escalation Criteria.
  3. On January 18, 2024 the following improvements will be available:
    1. If Reason: Urgency/Impact has Changed - This will also result in a notification to the Case Owner for review.
    2. If Reason: Request a Case Update - This will result in a notification to the Case Owner for review.
  4. If an escalation is generated - The Escalation Owner replies to the request with next steps.
    • NOTE - If the Request is invalid, the Escalation Owner will give reasons why and give process information to the requestor.
  5. If an additional help request is valid, the Escalation Owner evaluates the situation, prioritizes the request by importance and urgency, and works with the engineers to set expectations regarding next steps.
  6. Escalation Owner updates the case with all more external communications with the customer or partner regarding the request.

Communicate directly with an Escalation Owner (Non-FedRAMP only)

Once a non-FedRAMP case is escalated, you can communicate directly with the Owner of the escalation from the Escalation Details tab on a case. The Case Details captures the technical aspects of the case while the Escalation Detailscaptures the communication flow of the escalation.

IMPORTANT - Be sure to use the appropriate feed for your updates.

A closeup of a case in the Support Portal. The Escalation Details tab is highlighted with a large navy mouse cursor, indicating that you should click that tab.


FedRAMP Cloud CX & Engage cases

FedRAMP cases can be escalated via the Support Portal site once they have been assigned.

  1. From the FedRAMP Support Portal, select a case.
  2. In the lower right of the case page, click Escalate Case.
    • NOTE - If the Escalate Case button is unavailable, an open escalation likely exists for the case.


If you do not have a My Support login, see Create a My Support account. To process your request more quickly, please include your Genesys Account Reference Number (GARN) as noted on your Software Fulfillment Notice or on your Genesys Software or Maintenance Renewal Quote. 

If you have a My Support login:

  1. Login to the Support Portal.
  2. Select Continue to your Dashboard.
  3.  At the bottom-right of your dashboard, select the Activation File Request tile.

Any individual who has access to the My Support Portal will be assigned a Personal Identification Number (PIN). Upon calling Genesys Product Support, they may ask for your PIN to verify your identity.

If you forgot your My Support credentials or are having issues logging in, try the Forgot Password option to confirm your credentials. If issues persist, ask a colleague to open an Admin Case.

CAUTION: Your PIN is tied to your personal information. Never divulge your PIN elsewhere.

  1. Login to the Support Portal. You will automatically be directed to the My Support Cases page.
  2. Click on your name in the upper right-hand corner of the page.
    • A screenshot of the Support Portal with a large orange arrow pointing to the words, "Welcome back, Matt Ryan."
  3. Click My Support Profile from the drop-down menu. 
  4. Your PIN and other personal information will listed just before your First Name
    • A close-up screenshot of a portion of the My Support Profile page in the Support Portal. A large orange arrow points to IVR Code/PIN

Only Designated Contacts have access to create, update, close, or re-open a case. Other employees who work for Genesys direct customers, Partners, Resellers, or end users can request Read-Only access to the My Support Portal to view cases opened by Designated Contacts on behalf of their company.

The My Support Portal allows you to:

  • Open and manage your support cases (Designated Contacts only)
  • Search our Knowledge Base and Technical Documentation site
  • Register for and view our Genesys Engage Tech Tutorials
  • Learn about current Product Support news and announcements
  • Access Genesys Care Apps and Tools (Designated Contacts only)

Inside My Support Portal, you can review all Genesys deployments you have access to.

  1. Login to My Support Portal.
  2. Click the drop-down arrow beside your username and go to Manage Profile > My Support Access.
  3. You can add or remove access to other deployments by filling the form on the page and clicking Submit Request. This can also be achieved by opening an Admin Case.

WARNING:Support Access Levels are assigned to Designated Contacts in EACH active deployment. If you are meant to create a support case for one of your newest customers or for a new deployment from one of your previous customers, you will need your access level assigned BEFORE you can create a support case

Product Support is scheduled for 24x7 support coverage.

If you do not have a My Support account, you must request an account. Your corporate email address will be required. Allow 48 business hours to receive your credentials.

NOTE: If you are having trouble with your My Support credentials or are unable to login, try the Forgot Password option.

Non-urgent issues 

Web

Open new cases via the My Support Portal.

Phone

See our phone listings for your local number.

Email

WARNING: Do not use this email address to report new issues or open Cases. Use web or phone to open new Cases.

  • Use customercare@genesys.com for all email communications with Product Support.
  • You can contact us via Email for updates on existing Cases or if you are unable to login to My Support.
  • You can update an Open Case by Email if you reply to an Email originated from the Case by a Genesys Customer Care representative or to an automated Case notification. An Email originated from a Case includes a special Reference ID, which ties any reply back to the Case.

Urgent issues

  1. Call Product Support.
  2. Your Personal Identification Number (PIN) may be required to verify your identity, see Locate your PIN.

Are you still having issues?

  1. Create an email with the following information:
    • Full name
    • The email address associated with your My Support account
    • Company or partner name
    • Phone number
    • Description of the issue (e.g., cannot login, bad link, etc.)
  2. Send the email to:

To request a new support account for another individual, you will need to open an Admin Case (see Create an Admin Case.).

  • Case Sub Type: Create New My Support Account
  • In the Description entry, include the full name, corporate email address, and contact number of said individual.

Search Alerts allow you to create an email subscription based on your search results. When a document is updated that matches the search results, you will receive an email. Emails are sent either daily, weekly, or monthly.

Create a Search Alert from a query

  1. Start at your Knowledge Search results page. You can search using keywords in the text field, as well as narrow down your search by selecting different Knowledge Sources. You can also narrow down the search using the filters on the left-hand side. Please note that different sources will show different filters.
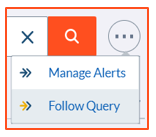
  2. Once you have your search specified, click the "ellipsis" icon on the right side of the search text box, and select "Follow Query".
          Follow Query.png
  3. You will see a confirmation message similar to You will receive alerts when the query Security Advisories returns new or updates items.

Follow a search result

You can follow an individual search result to receive an email when it is updated.

  1. Next to a search result, click the ->> Follow.
  2. Click ->>Follow again to unfollow.

Manage your Search Alerts

  1. To the right of the search bar, click  More options.
  2. Click Manage Alerts.
  3. You will see your list of Alerts. Here you can choose to receive the Alerts daily, weekly, or monthly.
  4. When following a query type, you have the option of editing the text field should you wish to expand on the description. For example, Security Advisories – using Genesys Engage facet. Please note this doesn’t change the query expression.
         

Example: Create a Search Alert for release notes

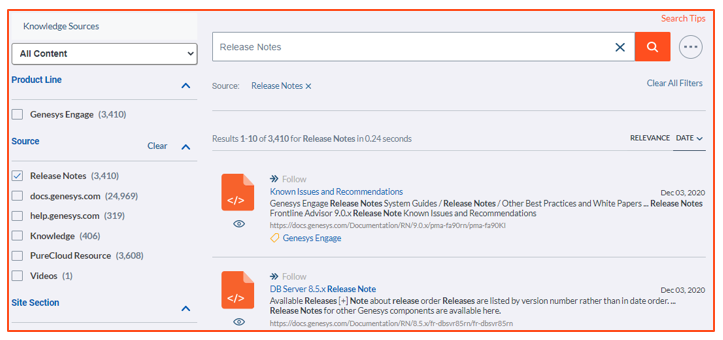
  1. Create a query to select the Release Notes you are interested in. In your search query, you can type:
    • release notes
  2. On the search results page, set the Knowledge Source dropdown to All Content.
  3. Select Release Notes in the Source section. 
         Search Alert.png
  4. Follow the query by clicking the ellipses, then selecting Follow Query.
         Follow Query.png

When you open a My Support account, a profile is created with your information. 

NOTE: New profiles cannot be created from an existing profile. New My Support accounts must be requested using Request My Support Account.

You may also submit an admin case to request information updates on your profile. The following information is mandatory for a My Support profile:

  • First Name
  • Last Name
  • Your individual corporate email address
  • Employer
  • Country

When should I update my profile?

  • Change of employer
  • Change of contact information (e.g., email address, phone number, etc.)

How to update your profile

  1. Login to the My Support Portal.
  2. In the upper-right, click the dropdown arrow next to your username and go to Manage Profile > My Profile tile.

As described for Search Alerts, you can subscribe to specific article alerts to stay informed on current product information. Genesys recommends that all Designated Contacts, at minimum, subscribe to Genesys Security Advisories to get immediate notification on critical security notices. Product advisories can be searched within Problem/Solution Article type.

Search for Security Advisories

  1. Login to My Support
  2. In the search field, type
    • security
  3. Press Enter.
  4. On the left-hand sidebar, set the Knowledge Sources dropdown to Customer Care Articles.
  5. Under Article Type in the left-hand sidebar, select Security Advisories.
  6. If you want to see the latest Security Advisories at the top of the results list. select Relevance Date at the top right of the Results List and select a date.

Subscribe to Security Advisories

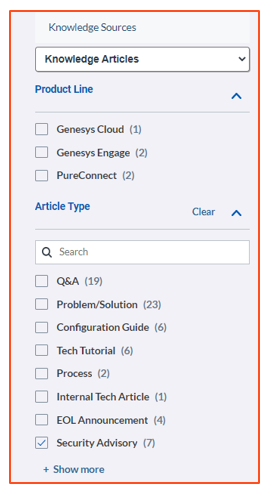
  1. On the left-hand sidebar, set the Knowledge Sources dropdown to Knowledge Articles.
  2. Under Article Type in the left-hand sidebar, select Security Advisories.
         Subscribe Security Advisories.PNG
  3. Click on the ellipsis beside the text search box, select Follow Query.
          Follow Query.png​​​​​

NOTE

  • As of  2015, support for has been discontinued support for Internet Explorer 7 and 8.
  • Opera is not supported
  • Internet Explorer 9, 10, and 11
  • Edge (Chromium only)
  • Chrome, most recent stable version
  • Firefox, most recent stable version
  • Safari versions 5.x and 6.x on Mac OS X


If you are a Business Edition or Enterprise Edition Customer, you may request a change request or MAC/D through My Support. If you are a Premier Edition or Outbound Engagement Customer, you must make each MAC/D request through your Customer Success Manager (CSM).

Each MAC/D acceptance notification will include an Order and an SOW for undertaking the requested MAC/D. Orders and SOWs will require mutual execution by the applicable parties before proceeding. If the MAC/D is rejected, your CSM may work with you to modify the request and for re-submission.

Each MAC/D request will be considered complete upon email notification to you of completion.

  1. Login to My Support.
  2. Click Open a Case
  3. Click Service Request
  4. Please provide as many details as possible for the required change including use Cases, if applicable.
  5. MAC/D requests will be acknowledged within one business day and accepted or rejected within two business days.


Genesys support offerings, also known as Genesys Care, are focused on your support experience through a global, live answer, 7X24 support model. Support is provided in accordance with the terms and conditions defined in the Genesys Master Software Licensing and Services Agreement ("Agreement") you have executed, as well as terms defined in this document and commonly recognized in the technology industry. Genesys offers three core support levels: Business CareBusiness Care Plus and Premium Care. Optional support add-ons, called Flex Care, are also available. With these support levels, you can tailor the level of support you need to put the power of your Genesys solutions to work for you. '

Feature Description Business Care Business Care Plus Premium Care Flex Care
Software updates & upgrades Provides access to all Genesys software upgrade/update releases and hot fixes for licensed and compliant software X X X  
24x7 Live Answer support with defined Service Level Targets Uses a tier-less support model so that each incoming case is immediately assessed for complexity by a Product Support expert and routed to the right certified professional to manage through restoration X X X  
Remote diagnostics Leverages industry-standard tools to remotely troubleshoot and assist with the investigation, resolution, and root cause processes X X X  
Knowledge base access Web-based repository of documents to share, answer questions, list best practices, & minimize effort toward resolving of known issues X X X  
Tech tutorials Provides knowledge, insights, and Q&A into the more advanced operations of the Genesys portfolio; recorded & delivered multiple times per year X X X  
Genesys Community Participate in forums, post questions, and exchange ideas X X X  
Chat with Product Support Case Owner Offers chat via computer or mobile device so that your Designated Contacts can chat directly with Genesys Case Owners about your cases X X X  
Mobile device access Handle open cases using the app (iOS and Android) X X X  
Troubleshooting tools including          
Workbench  A suite of troubleshooting tools to help ID and resolve issues faster X X X  
Log File Management Tool (LFMT) Stores app log files, quickly search and retrieve log files, scrub sensitive info before sending log files to Product Support   X X  
Log File Retrieval Service Allows Product Support to retrieve log files for you when investigating an open case. (Requires LFMT)   X X  
Remote Alarm Monitoring (RAM) Leverages intellectual property, tools, and best practices to prevent and mitigate issues before they occur. Receive notifications when Genesys detects supported critical and major alarms as well as proactive Product Support support if needed   X X X
Designated case management Monitors and updates your staff proactively regarding critical cases, participates in weekly case status calls, summarizes case activity on a quarterly basis and learns your environment and business needs to make relevant recommendations   X X  
Enhanced response targets Delivers accelerated response targets over Business Care service level targets; in addition, for critical, high, and medium severity service issues, response targets are improved by 50%   X X  
Technical Account Manager (TAM) Works as a designated advisor who establishes and maintains an understanding of your business goals, operations and priorities and acts as a main point of contact to drive risk mitigation and issue resolution, advise on training and manage regular reviews to discuss open issues and future project/product feature implementation planning     X X
Annual troubleshooting training session Genesys provides 1 annual troubleshooting workshop which equates to 5 free days of Genesys University training for one customer contact     X  
Upgrade advisor Provides a review of the software currently installed in the production environment compared with the latest available releases to identify potential issues in current versions, and highlight whether new release capabilities, functions, features and options could be beneficial     X  
Annual routing logic review IDs and mitigates risks associated with poor performance, invalid logic and inappropriate error handling; provides guidance on routing design, structure and documentation, and highlights any errors found; recommends options to make the logic more flexible, if necessary     X  
Support Architect (SA) Works as a designated advisor who establishes and maintains an understanding of your business goals, operations and priorities, and acts as a main point of contact for risk mitigation and issue resolution, advise on training and manage regular reviews to discuss open issues and future project/product feature implementation planning       X
Extended support Delivers advice and best effort error investigation and rectification on the configuration and operation of the end of service (EOS) software       X
Custom app support Delivers support for custom-developed modules, applications, and solutions developed by Genesys and selected partners       X
Special event support Provides preferred status attention from select Product Support resources during special events       X


Submitting an Idea for a new feature

Genesys encourages your ideas for new product features! Select the appropriate topic tab to learn more.

  1. To submit an Idea for a new product feature, login to Genesys Knowledge Network.
  2. Click on It looks like you own, Genesys Engage.
  3. In the Product Ideas Lab widget, click the Create an Idea button to access Product Ideas homepage.
  4. From the homepage, click on Add a Product Idea.
  5. NOTE: Remember to please provide as many details as you can.

Idea submission statuses

Community Review

Upon creation, the status of the Idea will be set to Community Review. This is where the magic happens... you tell us what you want us to build:

  • You and other customers in the Community will start the conversation by voting and commenting on all Ideas submitted.
  • Once an Idea has met the vote threshold, the Idea will be assigned to a Product Manager for review.

Under PM Review 

The Community spoke, and we are listening! Product Management and the Engineering teams are reviewing the Idea thoroughly. Upon review completion, Product Management will update the Idea status within 30 business days to Accepted, Will Not Implement, Feature Already Exists or Currently Not Planned.

Accepted

Great news! The Idea has been Accepted! Product Management will strategize a development plan with the Engineering teams to ensure the Idea is implemented in the next 12 months. Once that plan is finalized, the Idea status will update to In Development.

In Development

Let’s do this thing! The development strategy and plan has been completed. We have a scheduled release and we are actively building out the Idea. The Idea will remain in this status until it has been Delivered however, we will be posting updates throughout the process.

Delivered

Congratulations, the Idea is now part of the product!! Please read through the Admin Response for the Release Notes and other information on the implementation.

Will Not Implement

Thank you for participating in the innovation process at Genesys, however the Idea cannot be implemented within a reasonable amount of time or the Idea does not fit the current product roadmap. Product Management will provide additional details as an Admin Response.

Currently Not Planned

This IS a great Idea! However, Product Management does not have resources to dedicate to this effort. Product Management will review this Idea at a later date to see if we can fit in a future roadmap.

Feature Already Exists

We know our products can be complex at times. Product Management has identified this Idea as a feature that already exists. The Product Management team will attach documentation as an Admin Response in the Idea to help you utilize the current feature functionality.

Idea Escalation

For an escalation of an Idea that is in a status Under PM Review or Will Not Implement, please send the escalation request to Product Ideas Lab Help (IdeasLab.Help@genesys.com).

This forum is designed for Genesys Customers to have active discussions on technical topics.

For more information, reference Genesys Community.

How to access Community posts

  1. Login to My Support.
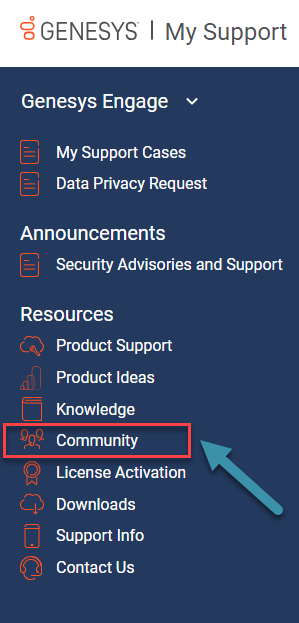
  2. Click the Community tile.
    Community.png
  3. If you need more help, please open a Case. Customer Care is always happy to answer your questions.

Actions you can take on posts

When viewing a post, you will see the words Like, Follow and Flag at the bottom of the post.

  • You can Like a post to show you agree with it.
  • You can Follow a post to receive email notifications when there are new comments.
  • You can Flag a post for Spam or Inappropriate content.

  1. Navigate to: 
  2. Click the LOG IN tab. 
  3. Enter your My Support credentials 
  4. Click Log In

Search tips

You can search for knowledge articles and other content on the My Support Home page using the Search box. Simply enter the question or text you want to search on and click on the magnifier button. You can also click on Knowledge tile.

Search results

Your search results will be listed in order of Relevance by default. Select Date to sort by date. Select it again to change the date order (new->old, old->new).

Knowledge Sources

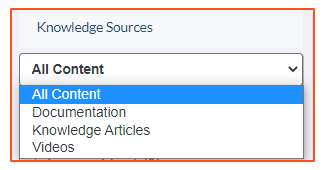
At the top of the left menu, you will see Knowledge Sources. This defaults to All Content. The drop-down arrow allows you to select specific sources. Selecting different sources gives you access to more filters.

  • All Content - All available content is searched
  • Documentation - Product Manuals and Guides created by Technical Publications
  • Knowledge Articles - Knowledge Articles created by Genesys Customer Care
  • Videos – Videos created by Technical Publications and Genesys Customer Care

Filters

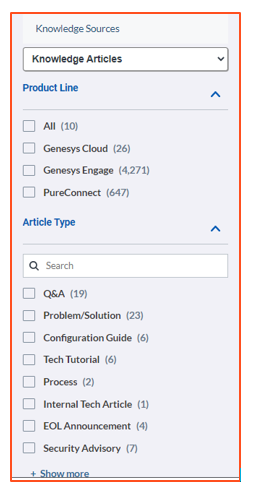
To refine or narrow your results list, you can select one of the options on the left-hand menu. The filter options are dynamic and depend on the Knowledge Source you have selected. Genesys recommends you start out with a text search and then filter if required.

Knowledge Filters.PNG

Wildcards

Asterisks - use to expand the search term. For example, orang* would find articles that contain orange and oranges.

Question marks - use to replace a character in the search word. For example, gr?y would find articles that contain grey and gray.

Operators

Knowledge Search supports the use of operators: ANDORNOT and NEAR. The NEAR operator allows you to search for two terms that are close to one another in the document.

For example:

  • apples AND oranges - would find articles with both apples and oranges in the text.
  • apples OR oranges - would find articles with either apples or oranges in the text, but not both.
  • apples NOT oranges - would find articles with only apples, no mention of oranges.
  • apples NEAR oranges - would find articles with apples and oranges in the text, where oranges appeared within 10 terms from apples.
  • apples NEAR:20 oranges - would find articles with apples and oranges in the text, where oranges appeared within 20 terms from apples.

Exact phrase searches

Knowledge Search supports the use of quotation marks “ ” to enforce exact search terms.

For example, “apples and oranges” would find articles that have "apples and oranges" in the text, but would not find articles with "oranges and apples", or the individual words "apples" or "oranges" that are separated by other text.

  • Simply type your question in the search box to get instant answers.
  • For best results, use keyphrases rather than keywords or type an entire question.
  • If you don't find a match, try phrasing your question differently.

The Automated Follow-up Service is designed to ensure timely and proactive follow-up with customers when we need information to advance a case towards resolution.  

Automated follow-ups will be sent to the customer Contact on the case according to the rules outlined below. 

NOTE: This process applies only to High, Medium, or Low priority cases. 

NOTE: The follow-up timer can start and stop several times for a case.  

Examples of requests that start the follow-up timer: 

  • Send environment information 
  • Describe what happened before application failure 
  • Send product logs 
  • Verify proposed solution 

1st follow-up 

When Product Support proposes a solution or requests information for an open case, a follow-up timer is started for that case.  

If there is no customer response within 2 business days, an automated email is sent to the customer contact who opened the case, with a reminder of the customer action requested (provide information or accept/reject solution), and a link to access the case. 

2nd follow-up 

If there is no customer response within 5 business days after Product Support proposes a solution or requests information for a case, a second automated email is sent to the customer contact who opened the case.  

This email contains a reminder of the customer action requested (provide information or accept/reject solution), and a link to access the case. 

3rd follow-up 

If there is no customer response within 10 business days after Product Support proposes a solution or requests information for a case, the case is closed, and a final auto follow-up Email is sent to the customer Contact who opened the case.  

All information in the case will remain intact for 30 days (including any logs or attachments). The customer can reopen it only by a telephone call to Product Support. 

NOTE: All data in a closed case (including any logs or other customer files) is purged from My Support 30 days after the case is closed. 

  1. Login to My Support
  2. If you have access to multiple product Dashboards, you can switch between them by selecting them from the dropdown. 
  3. From your My Support Dashboard, go to Cases > Open a Service Request.  
  4. Select the Cloud Deployment and Cloud Service then click Next
  5. Select the Case Sub Type and Priority.  
  6. Populate the remaining fields. 
    • NOTE: Provide as many details as possible in the Description and Business Impact fields to help us properly route your case. 
  7. Click Save

Announcements